


Your bathroom counter is probably a mess. Let’s be honest. It’s not about creating some zen retreat, it’s about not knocking your toothbrush into a puddle of who-knows-what every morning. A tray helps. It corrals the junk.
You can buy one, sure. Or you can make one that actually fits the space and doesn’t look like cheap plastic. I’ve been doing this stuff since ’98, and I’ve seen it all. The difference between a tray that lasts and one that turns into a warped, moldy mess in six months? It’s always two things. The material you pick and how you seal it. Always.
A bathroom is a warzone. Steam, water splashes, traffic. It’s tough on things. So if you’re going to build this, you have to build it for that. For the real world.
Planning Your DIY Bathroom Tray Project

Don’t just run to the garage and start cutting. Think for a minute. If you’ve never really built anything, stick with a simple wooden tray. It’s a good place to start. That resin stuff looks cool, but it’s a whole other level of messy and particular.
Look, I get it. Both options sound good. To help you decide which headache you’re signing up for, here’s how they stack up.
| The Choice | What You’re Getting Into | Best For… |
|---|---|---|
| Classic Wood | Cutting, gluing, sanding. Feels like a real workshop project. More forgiving on mistakes. | First-timers, or if you want a rustic or traditional look. |
| Modern Resin | Mixing chemicals, pouring, waiting. It’s more like a science experiment. Messy, but cool results. | Someone patient, with a well-ventilated space, going for that super modern, glassy look. |
My Take: If this is your first project, stick with wood. It’s straightforward. Resin looks amazing, but your first pour is almost never perfect. It’s a skill you have to learn.
Either way can look good. If you take your time. The point isn’t just to make a pretty little thing for your soap. It’s to build something solid that won’t fall apart the first time you spill something on it. And you will spill something on it.
How to Build a Classic Wooden Tray
Wood. It’s classic for a reason. You can make it look rustic or modern or whatever. But the most important part happens before you even plug in the saw: picking the wood. Stay away from soft pine. Seriously. Unless you plan on sealing it within an inch of its life. Go for something with some natural moisture resistance. Teak is great but pricey. Cedar works. A good piece of oak is fine, too.
The wood aisle can be overwhelming. To cut through the noise, here’s a quick rundown of what you should be looking for.
| Wood Type | My Honest Opinion | Price Tag |
|---|---|---|
| Teak | The best of the best. Naturally oily and water-resistant. It’s what they use on boats for a reason. | High. You’ll pay for the quality. |
| Cedar | A solid choice. Has that great smell and holds up to moisture pretty well naturally. | Mid-range. Good value. |
| Oak | Tough and heavy. A good-looking wood, but you absolutely have to seal it right. | Mid-range. Common and reliable. |
| Soft Pine | Avoid it if you can. It’s cheap, but it dings easily and soaks up water like a paper towel. | Low. You get what you pay for. |
Pro-Tip: Don’t just look at the price. Feel the wood. A dense, heavy piece of oak is going to be a hundred times better than a light, cheap piece of pine, and the final product will show it.
First, measure your counter. Figure out what size you actually need. Something like 12 by 8 inches is pretty standard, but every bathroom’s different. Had a job last year, tiny little vanity in a powder room, we made one that was barely 9 inches long. Cut your base from a solid board. For the sides, a 1×3 board cut down to maybe an inch and a half tall usually looks about right.
Miter the corners if you can. A 45-degree angle just looks cleaner. More professional. But if you don’t have a miter saw, don’t kill yourself over it. Butt joints will work. They’re just not as pretty.
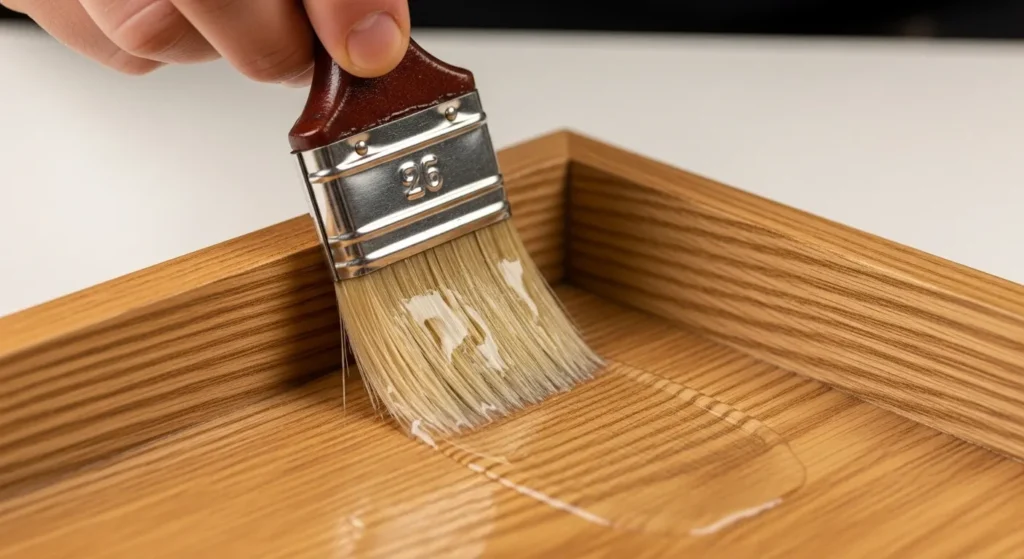
Slap it together with good wood glue. And I mean good wood glue. Titebond III. It’s waterproof. Don’t cheap out here. A few brad nails will hold it all together while the glue sets. Then wait. Let it cure completely. After that, you sand. Start with a rougher paper, like a 120-grit, to knock down any high spots, then finish it with 220-grit until it’s smooth. Real smooth.
Now, the part everyone gets wrong. Sealing. You need at least three coats of something actually waterproof. A marine varnish, the kind they use on boats, is your best bet. Or a good polyurethane. And you have to sand lightly between coats. This is what keeps it from soaking up water and turning black in the corners. I’ve seen it happen. Too many times.
Creating a Modern Resin Pour Tray
Alright, so you want the fancy resin tray. It can look great, like a piece of glass. But it’s fussy. You’ll need a silicone mold, you can buy them online. Or you can make a box out of melamine, that particle board with the white plastic coating, and seal the inside corners with silicone caulk.
Get a two-part epoxy kit. The brands you see everywhere, ArtResin, TotalBoat, they’re fine for people just starting out. And please, do this somewhere with open windows. A garage with the door open is best. Wear gloves, wear glasses. This stuff is no joke. Follow the directions on the box. Mix it slow. If you whip it up like you’re making eggs, you’ll just fill it with bubbles. You can toss in mica powders or alcohol inks for color.
Pour a real thin layer to start. Then you get a little torch or a heat gun and you wave it over the surface—pop pop pop—gets rid of the bubbles. Now you can get all artistic. Throw in some dried flowers or whatever. Small rocks. I saw one a lady made with broken tile from her backsplash. Looked pretty good.
Let that first layer get a little hard, just tacky, then pour the rest. Then you have to just leave it alone. For a day. Maybe three. Depends on the brand and the temperature. Once it’s hard, you can pop it out of the mold. The edges might be sharp, so a little sandpaper will knock them down. Oh, and stick some little rubber feet on the bottom so it doesn’t scratch up your counter. You can add handles, too, if you want.
Upcycling Materials for Your DIY Bathroom Tray
You don’t have to go buy new lumber. Sometimes the best stuff is leftover scraps from another job. It saves money and gives the thing a bit of a story.
But you have to be smart. Just because it’s a scrap of wood doesn’t mean it belongs in a bathroom.
Working with Wood Scraps
Got some leftover hardwood flooring? A piece of an old shelf? That can work. The rules are the same. It’s all about fighting the moisture.
And if you’re thinking about using plywood… you have to seal it perfectly. I mean every single edge. Plywood is just thin layers of wood glued together. The minute water gets in between those layers, it’s over. It’ll swell up like a sponge.
I saw a guy do this once, a homeowner out in that new subdivision by the highway. Made this really nice tray out of birch plywood, finished the top and bottom beautifully. But he missed the edges. A month. That’s all it took. The corners were bubbled out and totally ruined. You gotta use a good primer and then a few coats of poly. On everything.
Repurposing Marble and Tile
Now this is a good idea. If you’ve got a leftover piece of stone from a countertop, or a few extra tiles, that’s perfect. That stuff is basically bomb-proof. For a single piece of marble or quartz, the job’s easy. Just make sure the edges aren’t sharp. Stick some felt pads on the bottom. Done.
If you’re using smaller tiles, you need a base to stick them on. A piece of cement board is best. Lay down your thin-set mortar, set the tiles, grout the gaps. And then—and this is the part people forget—you have to seal the grout. You must. Unsealed grout is porous. It will soak up stains and soap scum and you will never, ever get it clean again.
Finishing Your Tray Like a Professional
The finish is what separates it from looking like a school project. It’s the details.
Achieving a Professional Finish
If you’re going to paint it, don’t just slop paint on bare wood. You have to prep. Use a primer. For a bathroom, I like a shellac-based primer, something like Zinsser BIN. It stinks, but it seals wood better than just about anything.
After the primer’s dry, sand it. Lightly. Then use good paint. An enamel or a cabinet paint. It creates a much harder shell than the latex paint you put on your walls. A sprayer gives you the best finish, but if you’re using a brush, buy a good one and use thin coats.
Adding Custom Hardware
Handles or little feet can make a big difference. You can find them anywhere. Simple black handles for a modern look, something fancier if that’s your style.
Just measure. Measure twice. Drill pilot holes so you don’t crack the wood. Here’s a little trick: put a tiny dab of clear silicone in the hole before you put the screw in. Just another layer of protection against water getting in.
How to Style and Organize Your New Tray

Alright, you built it. Now what? The whole point is to contain the clutter, right? So be deliberate. Don’t just make it a new, slightly fancier junk pile.
Put your daily stuff together. The stuff you use every morning. Put a soap dispenser on there. Maybe a candle if you’re into that.
Try to vary the heights. A tall bottle, a short jar. It just looks better than a bunch of things the same size all lined up.
And don’t cram it full. A crowded tray looks just as bad as a messy counter. It’s supposed to make things look calmer, not give you more to look at.
People ask the same things over and over. It’s always about water.