


Alright, look. It might just be a toilet paper holder. I get it. But it’s one of those little things that tells you if someone did a job right or if they just slapped it all together. I’ve seen it all since I started doing this back in ’98. Flimsy junk that rips out of the wall the first time a kid yanks on it, and some that are so nice they almost tie the whole room together.
This isn’t just about finding a hook for the roll. It’s about getting a piece of hardware that feels solid. Something that’ll stand up to being used every single day without getting wobbly. And it has to look right with the faucet and all the other stuff you spent a fortune on.
Getting this little choice right… it’s a finishing touch. It’s what separates a decent job from a great one. It’s a small thing, but you notice it. Trust me.
Modern vs. Traditional: Finding Your Style
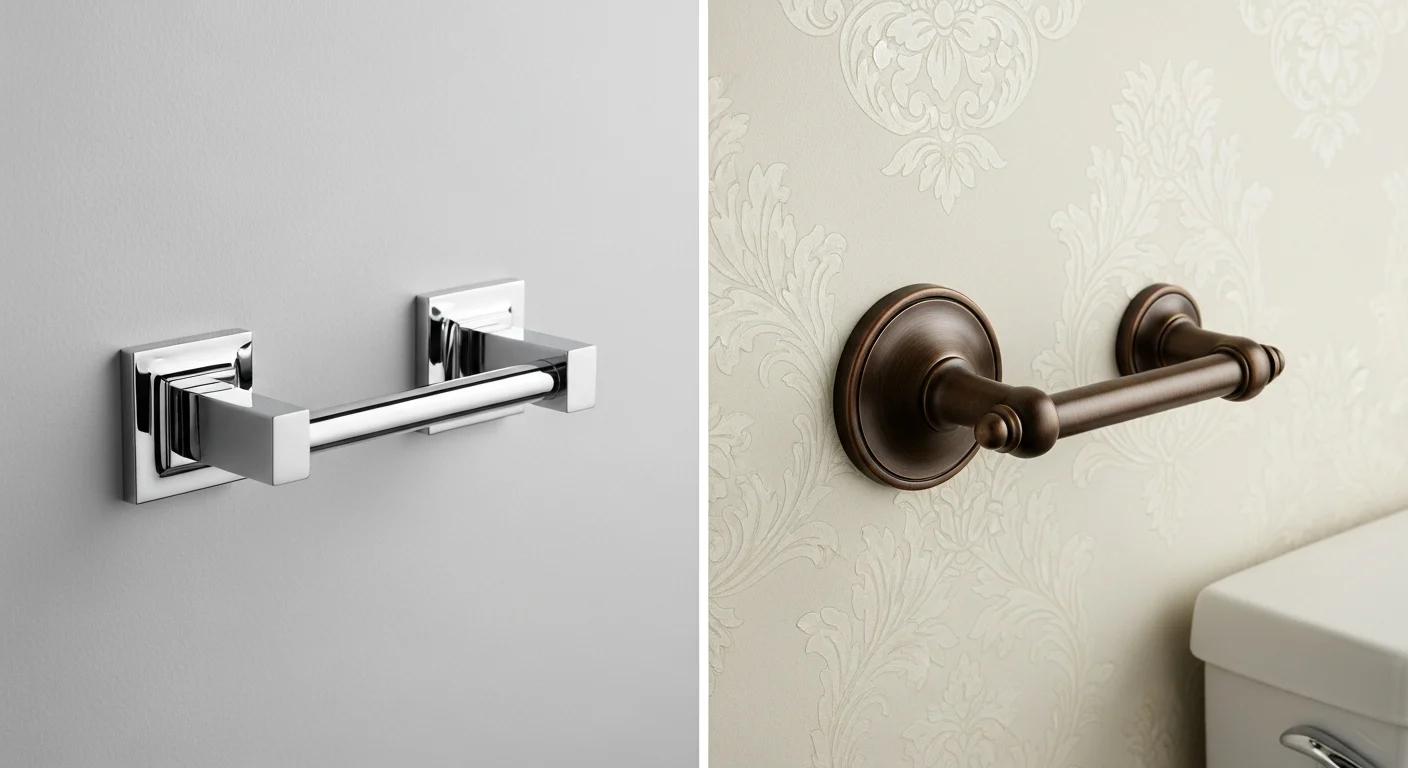
First thing you gotta figure out is the style. It’s the main fork in the road. You going for that clean, modern look, or something more old-fashioned? The holder has to speak the same language as everything else. If it doesn’t, the whole room just feels… off. You can’t put your finger on it, but it’s wrong.
With modern stuff, it’s all about less is more. That’s what they say, anyway. Clean lines. Simple shapes, squares and bars and what have you. No fancy business. They’re meant to just do their job and not make a big deal about it. Blend in.
You see it with brands like Moen, that Align collection they have, or the Trinsic line from Delta. They’ve got it down. The good ones are usually solid metal, feel heavy in your hand. They look right in those bathrooms with the floating sinks and the big gray tiles everywhere.
Then you’ve got the other side of it. The traditional stuff. That’s all about the details. Curves, fancy plates on the wall, little knobs on the end. These things are meant to be seen. They’re part of the decoration.
It’s that old Victorian look. Polished brass, oil-rubbed bronze. A good one feels like a little piece of furniture. It’s what you need if you’ve got a pedestal sink or one of those clawfoot tubs. Had a job restoring a place over on Chestnut Drive, beautiful old house, and you just can’t stick a minimalist chrome bar in there. It would look ridiculous. There’s also stuff in the middle, “transitional” they call it. It’s fine. Kinda boring, but it works if you can’t make up your mind.
To lay it all out, here’s the quick and dirty on how to tell them apart:
| Style | The Look | Best For… |
|---|---|---|
| Modern | Clean lines, simple shapes (squares, bars). No frills. | Bathrooms with minimalist design, floating vanities, sleek fixtures. |
| Traditional | Decorative details, curves, ornate wall plates. | Classic or historic homes, pedestal sinks, clawfoot tubs. |
| Transitional | A mix of both. Simple but with a few soft curves. | A safe choice that fits in with almost any decor. |
My Take: Don’t overthink ‘transitional.’ If you like elements from both, it’s a safe bet. But if you have a strong style in your bathroom, commit to it. A bold choice, modern or traditional, always looks better than playing it too safe.
A Closer Look at Popular Finishes: Nickel, Black, and Brass
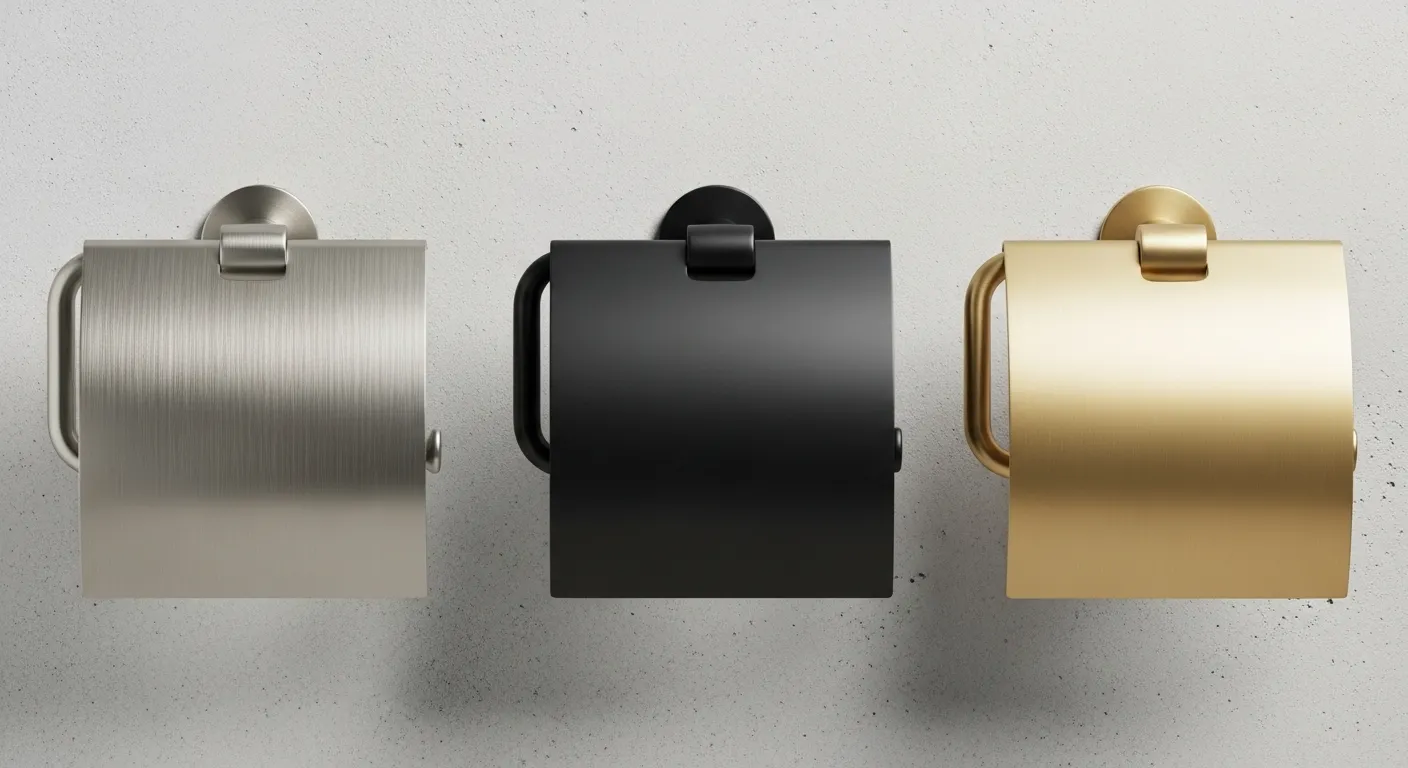
Okay, so you’ve picked a style. Now the finish. This isn’t just about the color. It’s about how it holds up. I’ve seen cheap finishes start peeling and pitting in just a couple of years. Makes the whole bathroom look tired.
Brushed nickel has been the king for a long time, and for good reason. It’s the workhorse. It has this soft look, and it doesn’t show every single fingerprint and water spot. That makes it a good choice if you’ve got kids. Low maintenance. The best part is that one company’s brushed nickel pretty much matches another’s. But a word of warning, the the cheap stuff from no-name brands can have a really thin coating that just wears right off. Spend the extra ten bucks.
Matte black. That’s the hot thing right now. Looks sharp, I’ll give it that. Gives you a bold contrast. Great for that modern farmhouse look people are into.
But I always tell people two things about matte black. First, the cheap ones scratch if you look at them wrong, and then you’ve got this ugly shiny silver showing through. Second, it shows dust and water spots like you wouldn’t believe, especially if you have hard water. You’ll be wiping it down all the time. The ones that are powder-coated seem to last a lot longer.
Brass is back in a big way. And not that shiny, fake-looking stuff from the 80s that your grandma had. The new stuff is different. Satin brass, brushed brass… it’s got this warm glow. Feels classy. And the solid brass fixtures, man, they have some heft. You pick it up and you know it’s quality. It’s gonna last forever. It costs more, sure. But it’s a real piece of metal, not just some plated pot metal junk.
Look, the specs can get confusing. Let’s put these finishes side-by-side so you can see what you’re really getting into.
| Finish | The Good | The Bad | My Verdict |
|---|---|---|---|
| Brushed Nickel | Hides fingerprints and water spots. Easy to match. Very durable. | Can look a bit dated if not part of a modern design. | The safest, most practical choice for a busy family bathroom. |
| Matte Black | Very stylish and modern. Creates a strong visual contrast. | Scratches easily on cheap models. Shows dust and hard water spots. | Looks fantastic, but be prepared for more cleaning. Buy a quality one. |
| Satin/Brushed Brass | Feels premium and high-end. Very durable, especially solid brass. | More expensive. Can be harder to match with other fixtures. | An investment. Worth it if you want a timeless, elegant look. |
Pro-Tip: Pay attention to that warranty. It tells you a lot about what the company really thinks of its own product, especially with finishes like matte black that can wear out. A lifetime finish warranty is a very good sign.
How to Install a Secure Toilet Paper Holder Wall Mount
There is nothing, and I mean *nothing*, that feels cheaper than a wobbly toilet paper holder. It drives me nuts. A solid installation is everything.
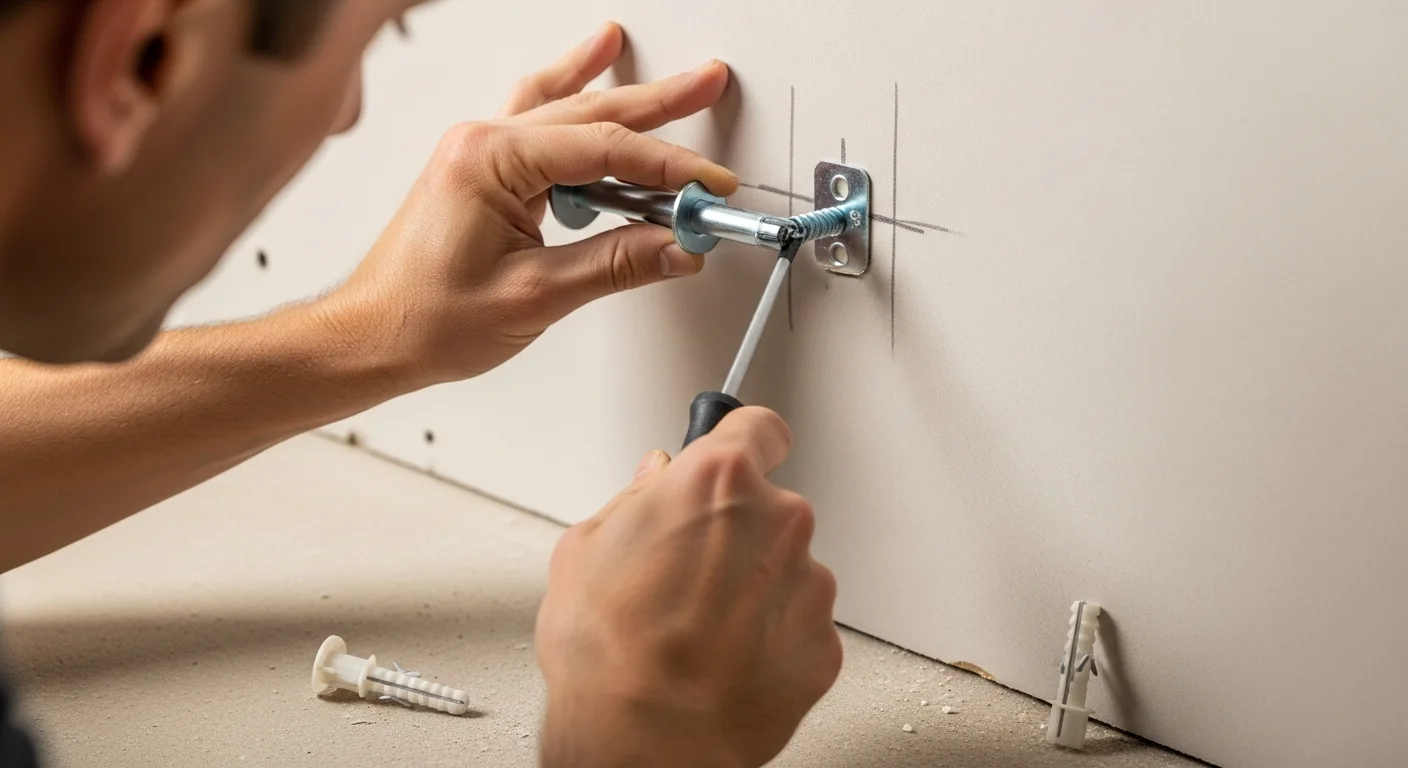
The best way, the gold standard, is to screw it right into a stud. Find that piece of wood in the wall, and you’ve got an anchor that will never, ever fail. I get out my stud finder, mark the holes, pre-drill, and sink the screws. It’s rock-solid. Period. If you can line it up with a stud, you do it. End of story.
Of course, the stud is never where you want it to be. It never is. So you gotta use drywall anchors. And let me tell you, the little plastic anchors they give you in the box? Garbage. Absolute garbage.
I throw them out the second I open the box. Go to the hardware store and get some decent ones. The self-drilling threaded kind are good. Or a toggle bolt if it’s a heavy holder, like one of those with a shelf on top. They grab the back of the drywall and give you a much better hold.
Here’s a little trick. After you drill the hole for the anchor, put a little dab of clear silicone in there before you tap the anchor in. It just helps seal it up, adds a little more grip.
What about those stick-on ones? People ask me all the time, especially renters. Honestly? Be careful. Some of them are okay for a while, the 3M ones can hold. But they’re temporary. I’ve been called to fix more than a few walls where one let go and took a big piece of the paint and drywall paper with it. The steam from the shower is their worst enemy. If you absolutely can’t drill a hole, fine, but don’t expect it to last.
To make this crystal clear, here’s how I rank the mounting options from best to worst.
| Mounting Method | How Solid Is It? | When to Use It |
|---|---|---|
| Into a Stud | Rock solid. The best you can get. Will never pull out. | Always. If you can hit a stud, do it. No excuses. |
| Heavy-Duty Anchors | Very strong. A great alternative when no stud is available. | For any installation into plain drywall. A must for holders with shelves. |
| Stick-On Adhesive | Weak. A temporary solution at best. | Only if you are a renter and absolutely cannot drill holes. |
My Take: Seriously, just throw away the anchors that come in the box. A five dollar trip to the hardware store for better anchors is the cheapest insurance you can buy against a ripped-up wall.
More Than a Roll: Holders with Shelves and Storage
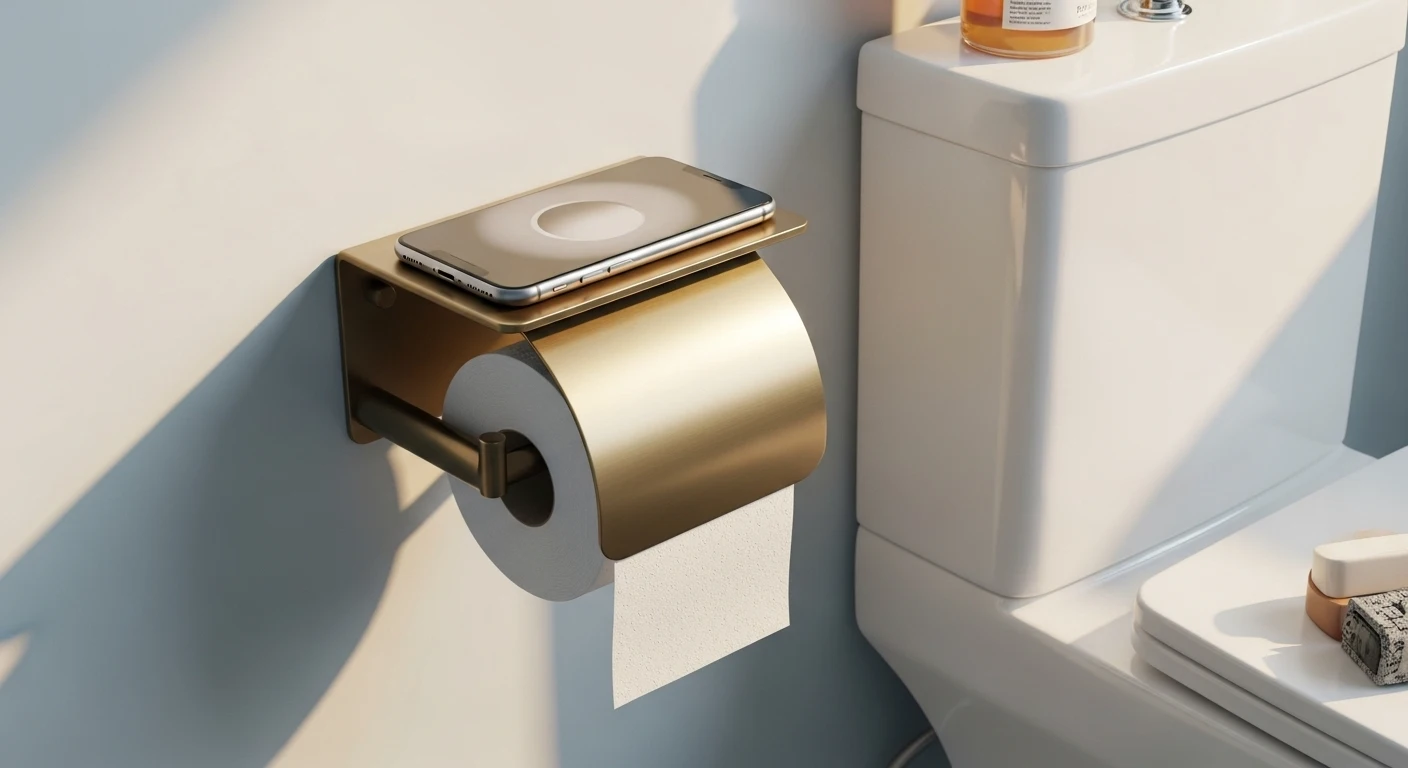
Lately, everyone wants these toilet paper holders that do more. The big one is the holder with the little shelf on top.
They’ve gotten really popular, especially for powder rooms where you’ve got no counter space. It’s a perfect spot for your phone. Everyone takes their phone in there, let’s be honest.
They’re useful, no doubt. I’ve put in dozens. But there’s a catch.
That shelf acts like a lever. When somebody puts something on it, or leans on it, it puts a ton of extra force on the screws in the wall. So for these, I’m a real stickler. You have to, *have to* use heavy-duty anchors. Better yet, get at least one of the screws into a stud. This is not the place for a stick-on mount or those flimsy plastic anchors. It will rip out of the wall. I promise you it will. Some of them now have little cabinets and hooks, which I guess is fine for stashing wipes or whatever. Keeps the top of the toilet tank from getting all cluttered up.
The Right Spot: Perfecting Placement and Height
The last thing is just figuring out where the heck to put it. It sounds simple, but if you put it in the wrong spot it’s either awkward to reach or you’re banging your knee on it. There are standards for a reason.
For height, the book says 26 inches off the floor to the center of the holder. For most people, sitting down, that’s about right. Then for how far out, somewhere between 8 and 12 inches from the front of the toilet bowl is the sweet spot. I usually just measure 10 inches from the very front tip of the bowl and make my mark. Easy enough.
But before you drill anything, do a dry run. Seriously. Sit on the toilet. Have someone hold the holder where you plan to put it. Reach for it. Does it feel natural? Can you get the roll on and off without being a contortionist? Is the bathroom door gonna smack into it? Taking thirty seconds to actually test it out can save you from patching holes in your new wall. It’s a simple little thing that makes a big difference.
If you just want the numbers without the chatter, here are the standard measurements I use on every job:
| Measurement | The Standard | Michael’s Tip |
|---|---|---|
| Height from Floor | 26 inches (to the center of the mount) | Measure from the finished floor, not the subfloor. |
| Distance from Toilet | 8 to 12 inches (in front of the bowl’s rim) | I use 10 inches as my go-to. It just feels right. |
My Take: These numbers are a starting point, not a law. The ‘sit down and test it’ rule is still the most important one. Always.
Conclusion
So yeah. It’s a small detail, a toilet paper holder. But all the little details add up. Think about the style, get a good finish that’ll last, and for the love of god, mount it securely to the wall. Put it in a spot that makes sense.
It’s one of those final things that pulls a job together. Makes it feel finished. And you won’t have to call me in a year to fix it.
How do I remove an old, glued-on toilet paper holder?
Ugh, the glued-on ones. It can be a pain. Your best bet is to gently heat it up with a hairdryer. Don’t melt the paint, just get it good and warm to soften the glue. Then take a piece of dental floss or fishing line, work it behind the holder, and just saw back and forth. It’ll cut through the gunk. For whatever sticky stuff is left, Goo Gone usually works, but test it somewhere hidden first so you don’t mess up your paint.
Can I mount a toilet paper holder on a vanity or cabinet?
Yeah, sure. That’s a good option if you don’t have a good spot on the wall. It’s easier than drywall. Just use short wood screws. You want them long enough to get a good bite, but, well, not so long they pop out on the inside of your cabinet. That’s a rookie mistake. Always drill a little pilot hole first so you don’t split the wood.
What’s the best way to clean and maintain these finishes?
Don’t overthink it. A soft cloth, warm water, maybe a tiny bit of dish soap. That’s it. Stay away from harsh cleaners, anything with bleach, or those scrubby sponges. They’ll scratch the finish right off, especially the matte black stuff. If you have hard water spots, a little bit of vinegar mixed with water will usually take care of it. Just be gentle.
Locate a Wall Stud
For the most secure, rock-solid installation, use a stud finder to locate the wood stud in your wall. Mark your holes, pre-drill, and sink the screws directly into the stud. This method ensures the holder will never pull out.
Use Heavy-Duty Drywall Anchors
If a stud is not available, discard the flimsy plastic anchors included in the box. Purchase and use high-quality, self-drilling threaded anchors or toggle bolts. These provide a much stronger grip on the back of the drywall and are essential for a durable installation.
Test Placement Before Drilling
Before drilling any holes, sit on the toilet and have someone hold the holder in the proposed location, typically 26 inches from the floor and 8-12 inches in front of the bowl. Check that it is comfortable to reach and does not interfere with movement or doors.