


Listen, I’m typing this quick on my phone while I wait for some grout to dry over on a job site. If you’re trying to balance a glass of wine or a paperback on a slippery tub ledge, you’re asking for trouble. Seriously. I saw a total mess out at Ivan’s place on Marsh Ln last month—broken glass everywhere because he thought a cheap plastic tray was good enough for his wife’s birthday gift. It wasn’t.
It slipped, he lunged for it, and well, the bathroom floor looked like a crime scene. You need a proper DIY bathroom tray that actually stays put and doesn’t warp after two showers. It’s not about being fancy or aesthetic, it’s about not having to fish your phone out of the bubbles while you’re trying to have a bit of peace. My thumb keeps hitting the wrong key but you get the point—let’s build something that actually works.
I’ve been doing this long enough to know that a bathroom is basically a war zone for materials. It’s hot, it’s wet, and most things just aren’t built to handle it. People spend thousands on fancy tile and then try to use a piece of scrap wood they found behind the shed as a bath shelf. It drives me nuts. If you want a DIY bathroom tray, you have to respect the humidity, much like you would when selecting a wooden bathroom vanity. Otherwise, you’re just making future trash.
Understanding the Basics of a Bathtub Caddy
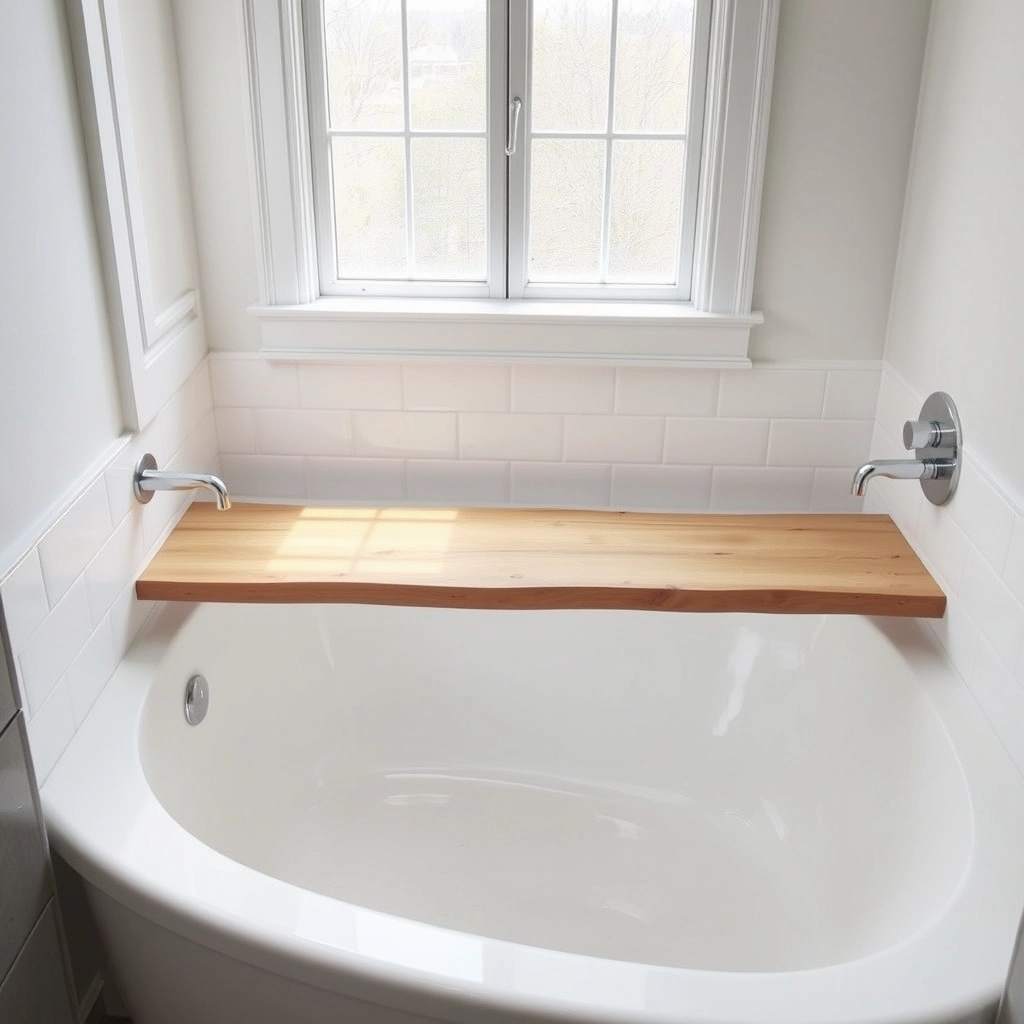
So, what are we actually talking about here? A DIY bathroom tray isn’t some high-tech piece of engineering. It’s a bridge. That’s it. It’s a platform that spans the width of your tub so you have a flat surface. It rests on the ledges. If you’ve got one of those freestanding tubs, it’s even more important because there’s zero shelf space.
If we’re talking about the vanity, it’s a zone of containment. I tell folks all the time that a tray on the counter stops your morning chaos from spreading like a weed. Whether you use wood, stone, or whatever, the goal is bathroom organization. It keeps your toothbrush from migrating over to your hairspray. I’ve seen people try to use old breakfast-in-bed trays for this, but those things are usually made of cheap veneer. They’ll look like a soggy Pringle in about three weeks.
You have to think about the physics. A bathroom gets steamy. That steam is just water looking for a place to land. If your tray isn’t built for a high-moisture environment, it’s going to grow mold or just fall apart. It’s a simple project, sure, but if you ignore the basics of how water interacts with different surfaces, you’re just wasting a Saturday.
What Materials Work Best for a DIY Bathroom Tray
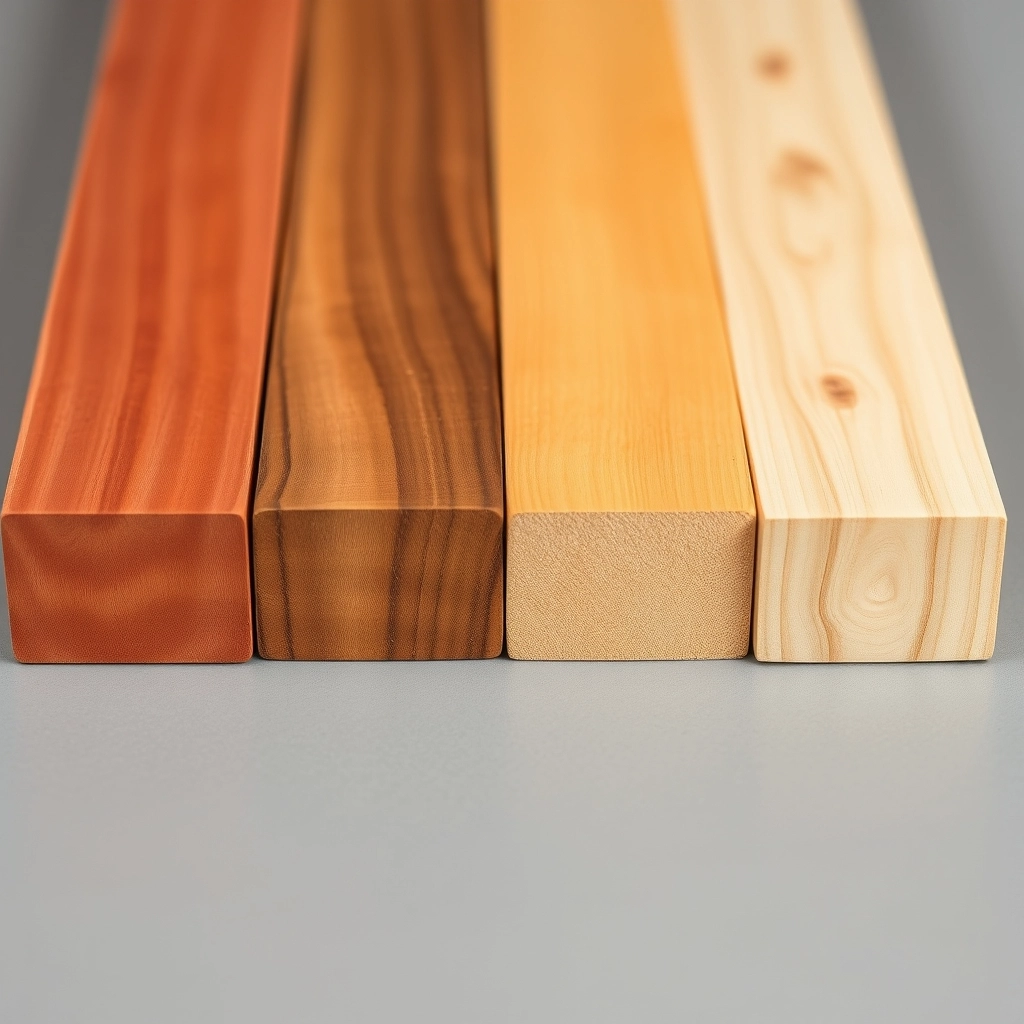
Materials. This is where most people trip up right at the starting line. You can’t just grab a piece of plywood and think a bit of paint will save it. For a DIY bathroom tray, you need what I call waterproof wood. I’m talking about species like cedar, teak, or mahogany. These woods have natural oils that basically tell the water to get lost.
Cedar is my go-to recommendation for most homeowners. Why? Because it’s light, it’s relatively cheap at the local yard, and it smells fantastic when the steam hits it. Teak is the gold standard, but it’ll cost you an arm and a leg, and honestly, unless you’re building a yacht, cedar does the job just fine. Mahogany is pretty, but it’s heavy and a bit of a pain to work with if you don’t have sharp blades.
I get asked about wood types more than anything else, so I put together this quick breakdown of what actually survives a steam room.
| Wood Species | Price Point | Water Resistance | Michael’s Verdict |
|---|---|---|---|
| Cedar | Moderate | High | The best choice for most DIY projects |
| Teak | Very High | Maximum | Overkill unless you have a massive budget |
| Mahogany | High | High | Beautiful but heavy and hard to cut |
| Pine | Low | Terrible | Avoid this unless you want a moldy mess |
My Take
Go with cedar. It is easy to find at any big box store and it won’t rot out on you after a month of hot baths.
The Pine Trap
Avoid using cheap pine or MDF for any bathroom project because these materials act like a sponge and will swell up the first time someone takes a long shower.
Now, some folks want to use tile. You can do that. You build a base out of cement board—the same stuff we use behind shower walls—and thin-set some leftover subway tiles on top. It looks professional. It matches the room. But keep in mind, that thing is going to be heavy. If you’ve got an old cast iron tub, fine. If you’ve got an acrylic tub, you might not want a ten-pound brick sliding around the rim.
Then there’s acrylic or lucite. It looks modern, sure. Very spa-like. But if you’re doing this DIY, acrylic is a nightmare. It cracks if you look at it wrong while drilling, and the edges need a lot of polishing to look halfway decent. Stick to a nice piece of live-edge cedar. It’s forgiving. It’s rustic, similar to the look of a rustic DIY bathroom vanity. And it won’t break your heart (or your tub) if you drop it.
Step-by-Step Guide to Building a Wooden Bathtub Tray
Let’s get down to the actual work. This is a Saturday afternoon job. You need a tape measure, a saw, and a drill. Step number one is the big one: measure your tub. Don’t eyeball it. Even if you think you have a standard bathtub size, measure from the outside edge to the other outside edge. If you just measure the hole where the water goes, your tray is going for a swim the second you touch it.
You want at least two inches of overhang on each side. If your tub is thirty inches wide, your board should be thirty-four inches. Grab a board that is about eight or ten inches wide. Anything narrower and you can’t fit a book; anything wider and it starts to feel like a dinner table is sitting on your lap.
Before you start cutting, here is a quick cheat sheet for the measurements you need to get right.
| Measurement Goal | How to Measure | The Pro Rule |
|---|---|---|
| Total Board Length | Outside edge to outside edge | Add four inches to the total width |
| Cleat Placement | Inside edge to edge | Leave a quarter inch of wiggle room |
| Board Width | Front to back of the tray | Eight to ten inches is the sweet spot |
My Take
Double check your tub width at the front and the back. Some tubs are tapered, and you do not want a tray that only fits at one end.
Step number two is cutting it to length. Simple enough. But here’s the secret sauce: the cleats. You need to cut two small strips of wood to screw onto the bottom. These cleats sit just inside the walls of the tub. They stop the tray from sliding left or right. Measure the inside width of your tub, and place those cleats so there’s maybe a quarter-inch of wiggle room. It’s a safety thing.
Step number three is the fun part. Customizing. Want a place for a wine glass? Use a spade bit to drill a shallow hole. Don’t go all the way through! Just enough to create a coaster effect. Want to watch a movie? Use a router or even just a hand saw to make a thin groove for your tablet to lean into.
Stability Secret
Glue a thin strip of rubber or silicone to the bottom of your cleats to prevent the tray from scratching your tub and to keep it from sliding around.
And sand the thing. Seriously. Use a fine-grit sandpaper, maybe two hundred and twenty grit. Spend some time on those edges. Nobody wants a splinter while they’re trying to relax. A smooth finish is what makes it look like you bought it at a high-end boutique instead of cobbling it together in the garage.
DIY Bathroom Counter Tray Ideas for Vanity Organization
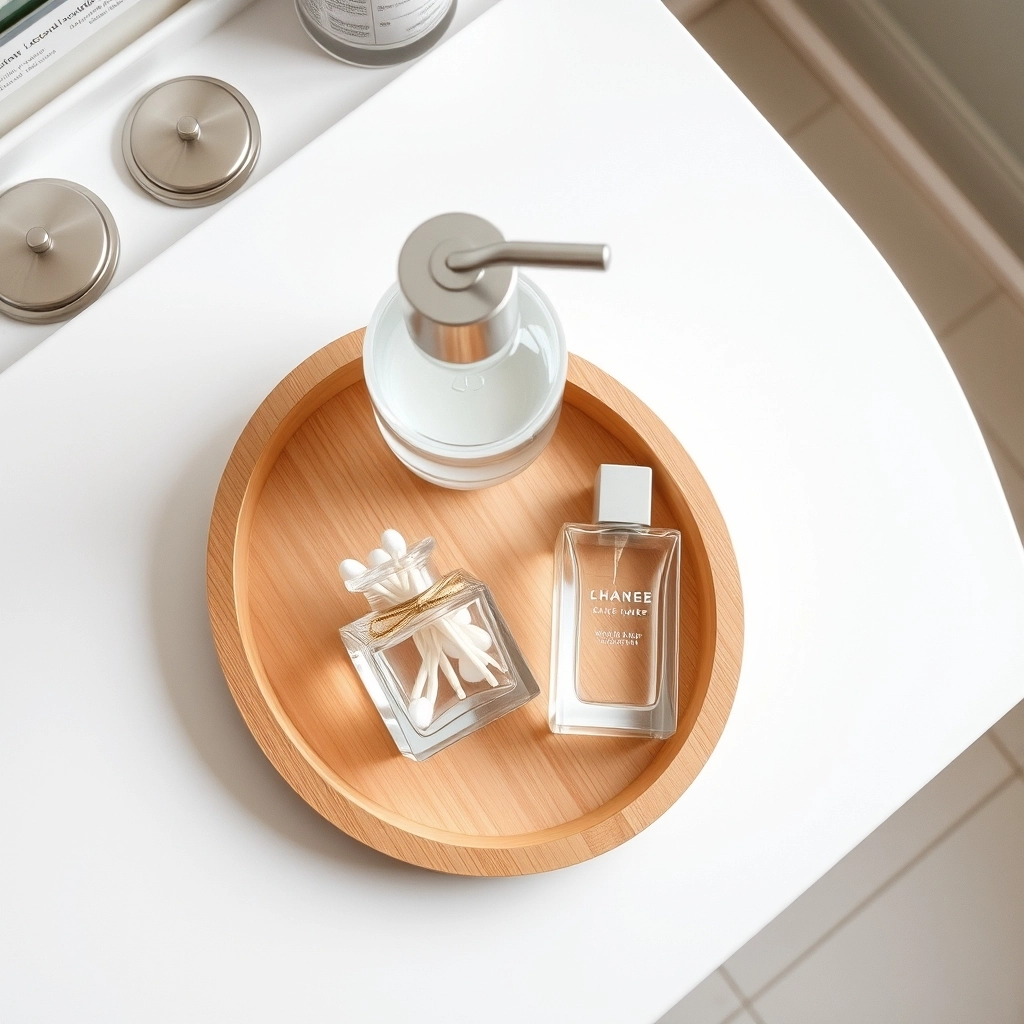
Maybe you don’t have a tub, or you’re more of a five-minute shower person. A DIY bathroom tray for your vanity is just as useful. Since it’s not sitting in a literal pool of water, you can be a bit more creative. I’ve seen people use old picture frames.
You take the frame, ditch the glass, and put in a piece of water-resistant backing or even a nice piece of patterned tile. It’s a quick way to get some bathroom organization and incorporate rustic bathroom accessories without spending a fortune. It makes cleaning easier, too. When it’s time to wipe down the marble, you just pick up the tray and wipe once, instead of moving the soap dispenser, the toothbrush holder, and the hair ties one by one.
Another trick is using a shallow wooden crate or a slab of stone. If you know someone who just did a kitchen remodel, ask for a scrap piece of granite or marble. You can take it to a local stone shop, and they’ll usually polish the edges for a few bucks. It adds weight. It feels expensive. The main thing for a vanity tray is to keep the sides low.
If the walls of the tray are four inches high, you can’t see anything. It just becomes a junk drawer that happens to be on your counter. Keep the height under two inches. That way, you can grab what you need without digging. It keeps things tidy but accessible.
How to Waterproof Your DIY Bathroom Tray for Long-Lasting Use
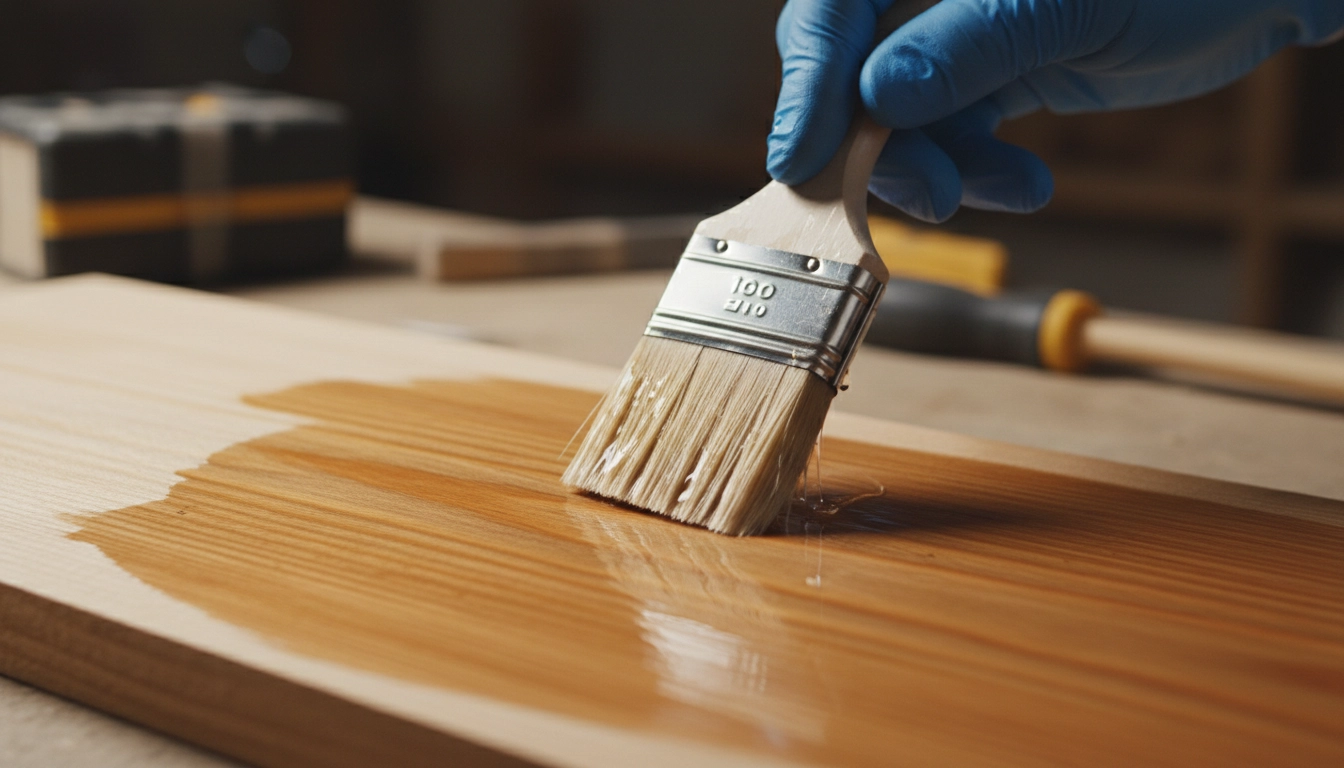
This is where the DIYers and the pros part ways. Waterproofing. If you leave that cedar raw, it’s going to turn gray and start to look like a piece of driftwood. Maybe that’s the look you want, but it’ll also start to hold onto soap scum and skin oils. Gross.
Use spar urethane. It’s what they use on boats. It’s designed to handle the sun, the salt, and the water. Most importantly, it’s flexible. Wood moves. It breathes. Spar urethane expands and contracts with it, so it won’t crack. Apply at least three coats. Thin ones. If you glob it on, it’ll look like plastic and take forever to dry.
If you want this thing to last longer than a week, you need the right sealer. Here is how the common ones stack up against each other.
| Sealer Type | Protection Level | Maintenance | Best Use |
|---|---|---|---|
| Spar Urethane | Maximum | Low | Bathtub trays that get soaked |
| Tung Oil | Medium | High | People who want a natural wood feel |
| Grout Sealer | High | Medium | Only for trays made with tile and grout |
| Beeswax | Low | Very High | Decorative trays that stay dry |
My Take
Do not overcomplicate this. Get a spray can of spar urethane and do three light coats. It is the only way to be sure water won’t ruin your work.
Drying Times
Let your finish cure for at least forty-eight hours in a dry room before you take it anywhere near a steaming bathroom.
If you’re the all-natural type, you can use tung oil or butcher block oil. But let me be honest: you’re going to be reapplying that every few months. I’m a “set it and forget it