


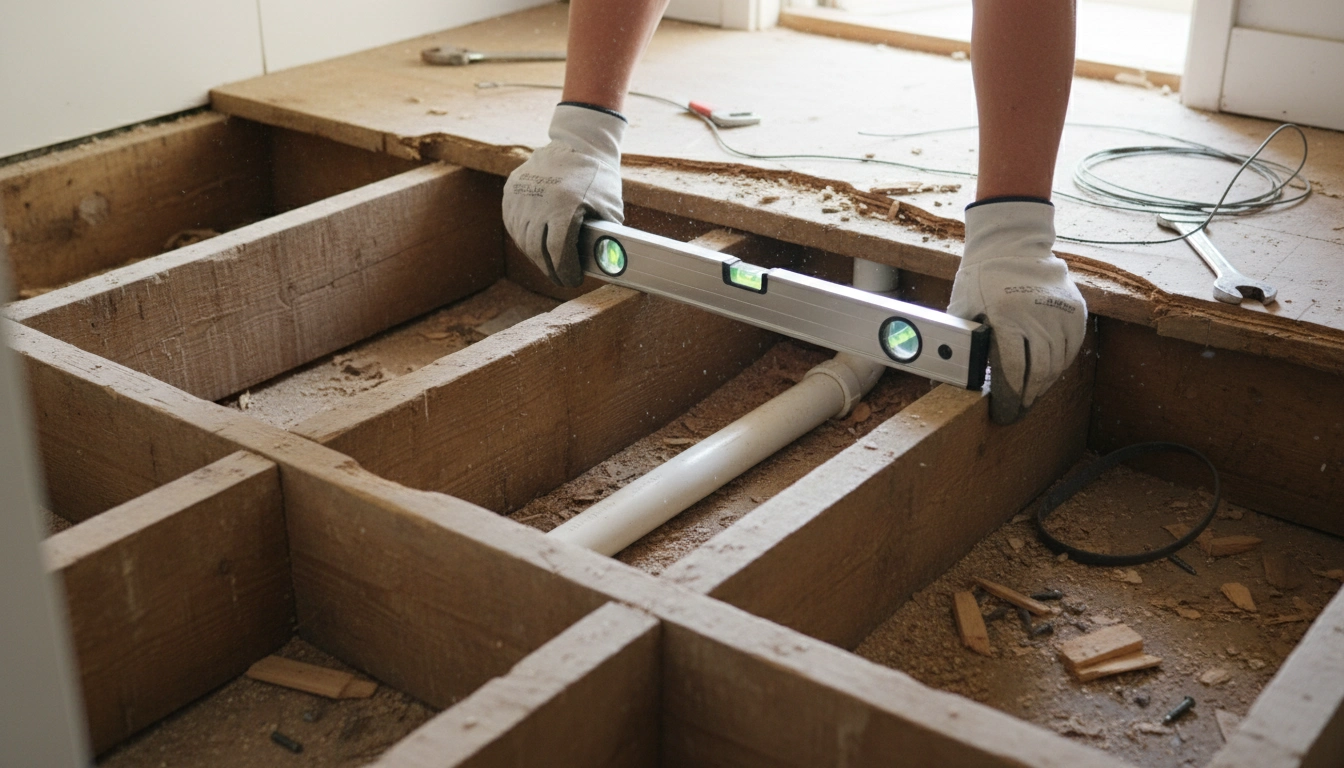
Water always wins. That is the cold, hard reality of residential architecture. If you give moisture even a microscopic path, it will find it and eventually rot your floor joists from the inside out. I was just texting Dennis about this—he is over on Harrison Ct in Hobart—and he had this guest bath disaster because the previous owner thought a close enough seal was fine. It was not.
- Understanding the Basics of a Wet Room
- Small Wet Room Bathroom Design: Space-Saving Solutions
- Small Wet Room Bathroom Design: Space-Saving Solutions
- Spa-Like Wet Room Bathroom Design: Tiles and Luxury Fixtures
- Wet Room Bathroom Design Pros and Cons: Practicality and Costs
- Wet Room Bathroom Design Trends 2026: The Future of the Space
Now his subfloor looks like a wet sponge. Honestly, if you are not ready to treat your entire bathroom like the sealed hull of a ship, do not even bother with the wet room bathroom design look. It is all about that seamless transition. No lips. No plastic trays. Just pure stone and a drain that actually works. It feels incredible underfoot, especially when the heating kicks in. Just… do it right the first time. It is not just a trend. It is about not having to tear your house apart in five years.
Actually, the best layouts are the ones where you stop thinking about the shower as a box in the corner. You have to view the entire room as a single, functional vessel. Every square inch (from the vanity to the toilet base) needs to be engineered to handle a literal flood while still feeling like a sophisticated, dry sanctuary. When you yank out those clunky framed glass doors, the whole vibe changes. It opens up. It breathes. You reclaim that floor space. This guide is basically my brain dump on how to master that transition so you end up with something structurally sound and not just a pretty mess.
Quick Access
This guide covers the technical foundations of ‘wet room bathroom design’, including tanking, drainage strategies, and luxury aesthetic trends for 2026.
Understanding the Basics of a Wet Room
A wet room is just a fully waterproofed box. That is the simplest way to put it. You are getting rid of that raised plastic tray and making the floor flush. The whole floor has to have a slight gradient—we call it the fall—to make sure gravity does its job and pulls the water toward the drain. This is not optional. If the guy doing your screed gets it wrong, you will have puddles by the toilet for the next decade.
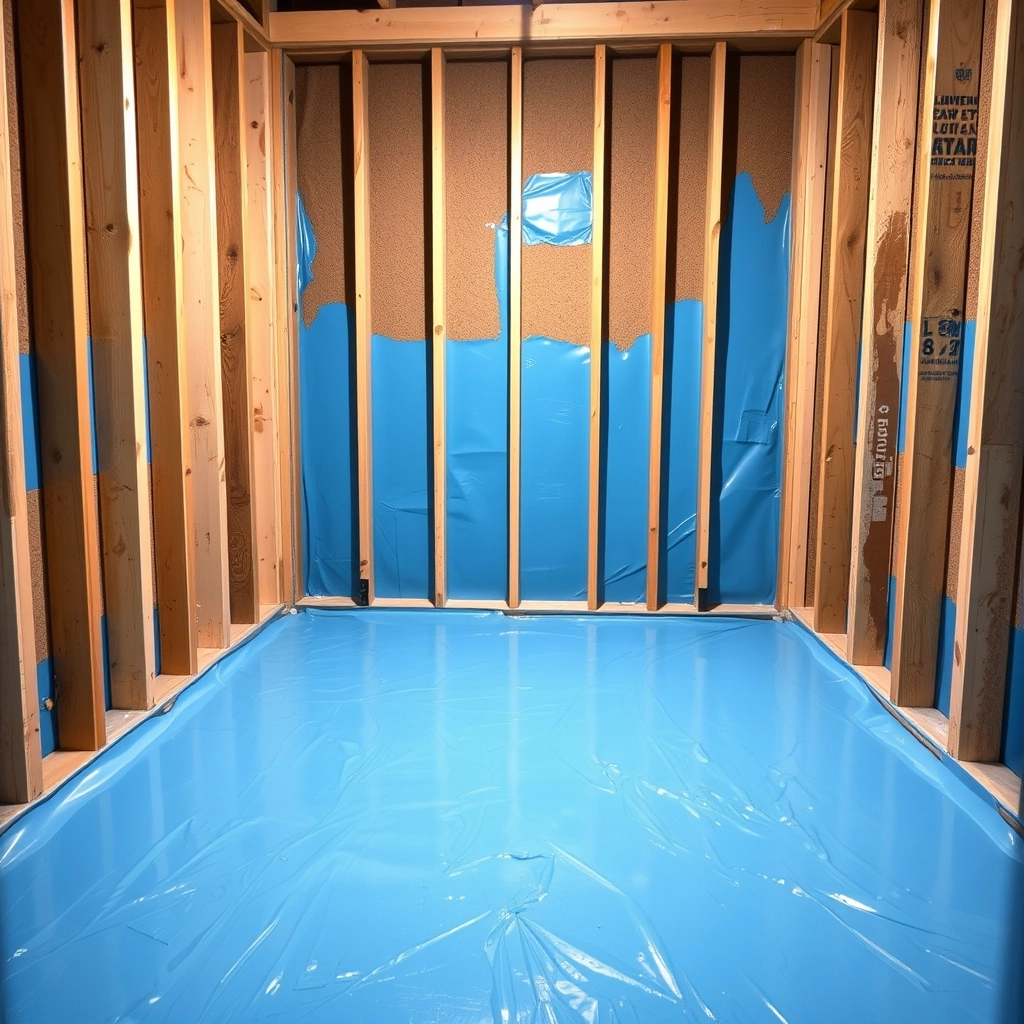
You need a waterproof membrane, which is the tanking phase, to seal everything. It is like wrapping your room in a rubber suit before you put the tiles on.
I put together this quick breakdown because people always ask me how a wet room actually differs from a standard setup.
| Feature | Standard Bathroom | Modern Wet Room |
|---|---|---|
| Floor Entry | Step-over lip or tray | Completely flush and level |
| Visual Space | Fragmented by enclosures | Open and continuous |
| Cleaning | Scrubbing tracks and seals | Simple wipe-down surfaces |
| Water Containment | Restricted to shower area | Entire room is waterproofed |
My Take
The flush floor is the real winner here. It makes the room look huge and saves your toes from that annoying plastic lip every morning.
Unlike those standard bathrooms where the water is trapped in a 900×900 square, a wet room uses the whole floor as part of the system. It requires serious precision. Actually, if that gradient is even a few millimeters off, it is a nightmare. Too flat? Water pools. Too steep? You feel like you are standing on a hill while you are trying to shave. It is a balance.
The Tanking Process
Tanking involves applying a liquid membrane or waterproof sheets to the floor and walls before tiling. It is the most critical step in a ‘wet room bathroom design’ because it creates an internal watertight envelope that protects the structure of your home from long-term dampness.
When we stop using barriers, we change how the room flows. You have to think about zoning. You do not want the shower spray hitting your fresh towels or the toilet paper roll. That is common sense, but you would be surprised how often people forget it. I always look at the topography of the floor first. Water is lazy; it takes the easiest path. You have to make sure that path leads exactly where you want it to go.
Small Wet Room Bathroom Design: Space-Saving Solutions
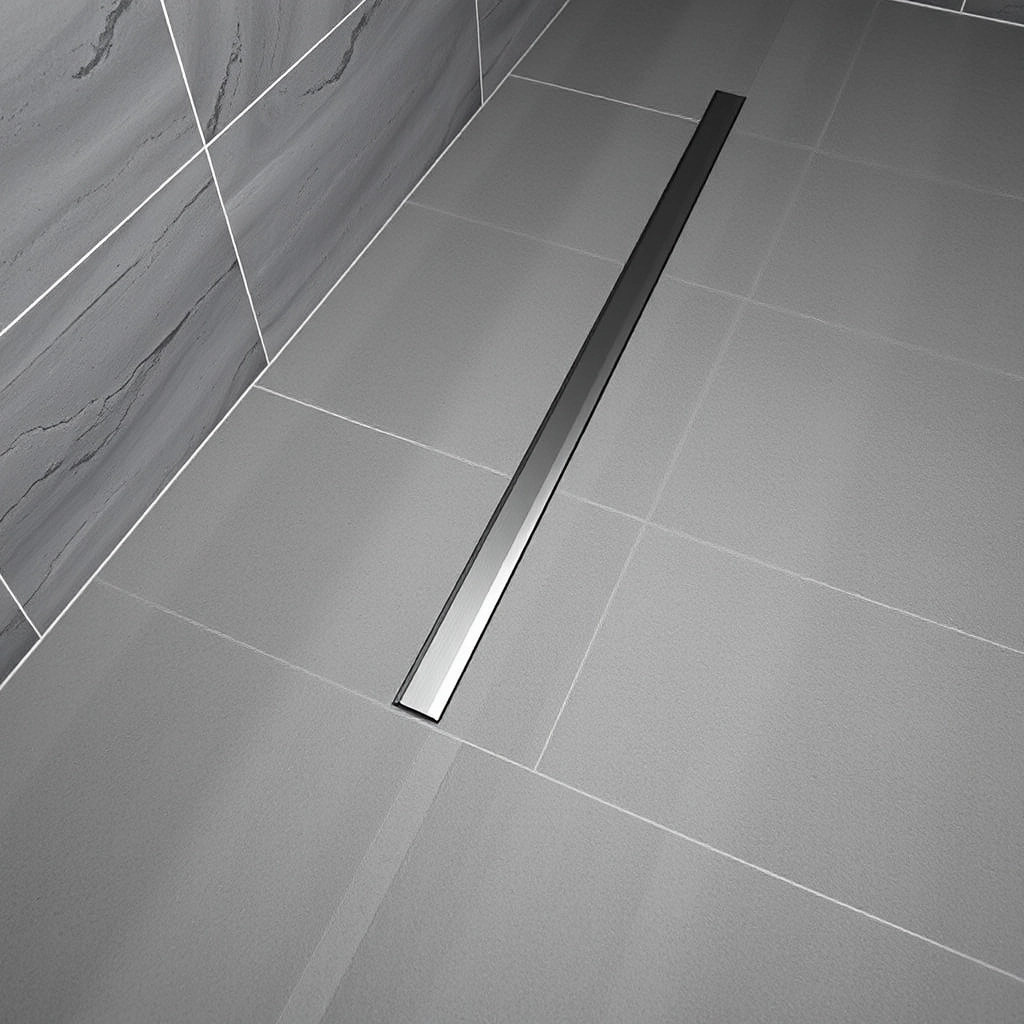
The drain is the heart of the whole thing. You have got two main paths: a central point drain (the old school hole in the middle) or a linear drain. Go linear. It looks better. Actually, it is more than looks—a linear drain (that long, skinny stainless steel strip) lets you use massive tiles. You do not have to do those ugly diagonal envelope cuts toward a center point. It keeps the visual lines clean and unbroken.
Choosing a drain isn’t just about the look; it is about how much work you want to do on the floor slope during the build.
| Drain Option | Slope Requirement | Tile Compatibility | Visual Impact |
|---|---|---|---|
| Central Point | Multi-directional pitch | Small mosaics or envelope cuts | Traditional and noticeable |
| Linear Strip | Single-direction pitch | Large format and stone slabs | Minimalist and high-end |
My Take
Go with the linear drain against the back wall. It simplifies the plumbing and lets you use those gorgeous large-format tiles without cutting them into ugly triangles.
If you tuck that linear drain right against the back wall, you only need the floor to slope in one direction. It feels more natural when you are walking. It also means fewer grout lines. Grout is the enemy. It is where the leaks start and where the mold lives. By minimizing it, you are making the whole system more robust. (And easier to scrub.)
You also have to respect the splash zone. Even without a door, water travels. It is physics. I usually suggest a single sheet of frameless glass—a deflector panel—just to catch the main spray. It keeps the room feeling open but saves your vanity from getting soaked every morning. You need that waterproofing to go way up the walls, too. At least 300mm in the dry areas and all the way to the ceiling in the shower. Do not skimp here.
Drainage Capacity
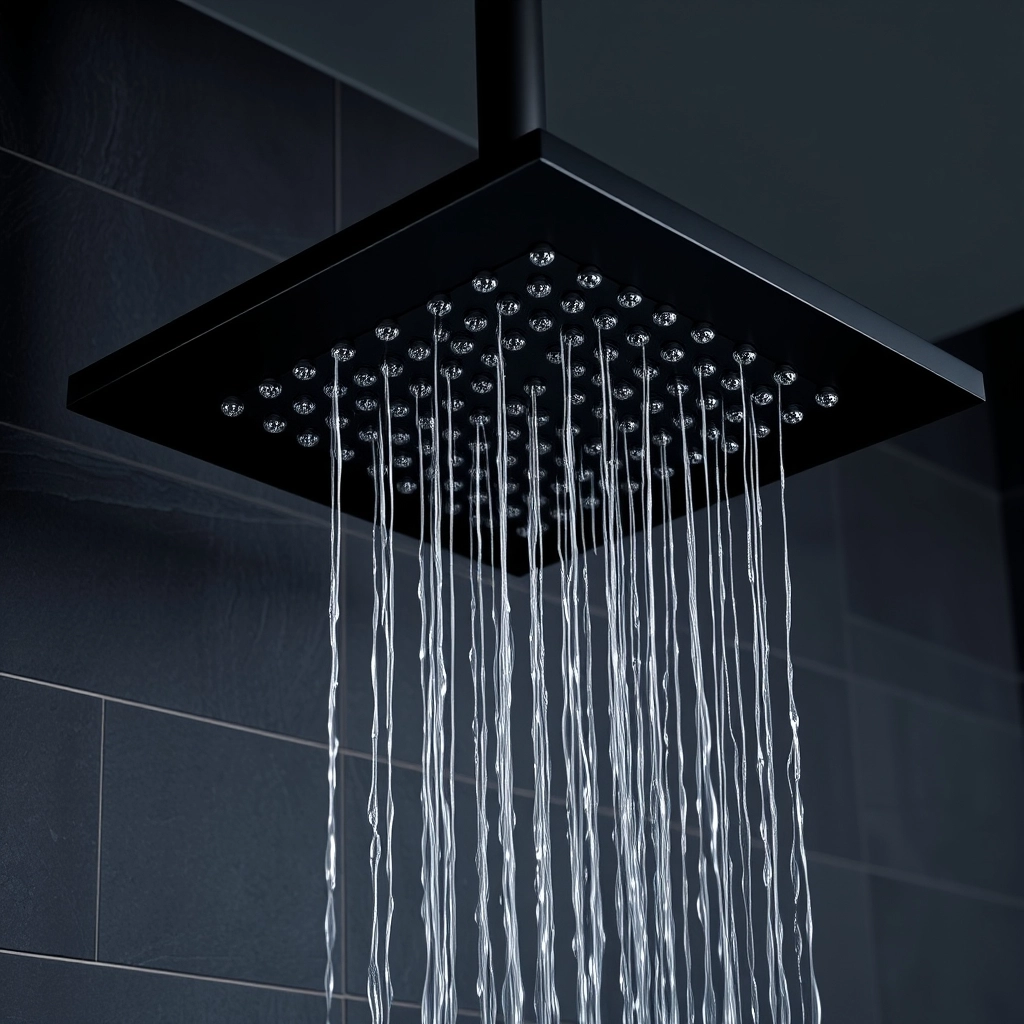
Always check the flow rate of your shower head against the drainage capacity of your floor waste. A high-pressure ‘monsoon’ head can easily overwhelm a standard drain, leading to unwanted pooling across the entire bathroom floor.
Small Wet Room Bathroom Design: Space-Saving Solutions
In a tiny bathroom, a wet room is a total lifesaver. It is the best way to stop a room from feeling like a coffin. When you remove the shower curb and the bulky glass box, your eyes see the whole floor. That perceived square footage is a real thing. It makes a 5×7 room feel like a master suite.
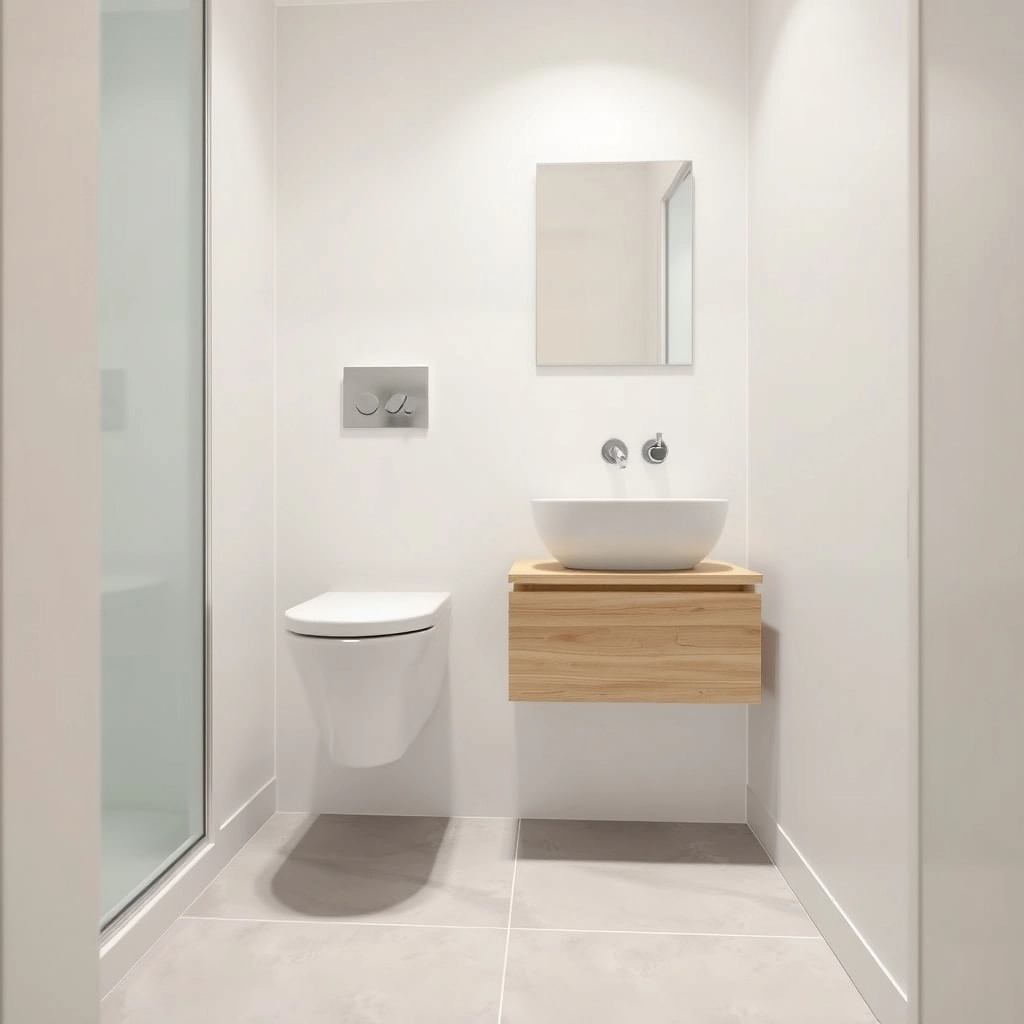
Wall-hung stuff is mandatory here. A floating vanity. A wall-mounted toilet. If you can see the floor going all the way to the wall under the fixtures, the room feels double the size. It is a visual trick, but it works every time. Plus, you do not have to worry about a shower door swinging out and hitting the toilet. There is no door.
If you are working with a tight footprint, these three moves will make the room feel twice as big.
| Fixture Choice | Space-Saving Benefit | Visual Result |
|---|---|---|
| Floating Vanity | Frees up floor tiles | Increases perceived room depth |
| Wall-Hung Toilet | Removes bulky base | Creates an unbroken floor line |
| Folding Glass | Tucks away when not in use | Maximizes walking area |
My Take
In small spaces, every inch of visible floor counts. If you can see the floor under the toilet and vanity, your brain thinks the room is much larger than it actually is.
For the really cramped spots, I tell people to use the same tile for everything. Walls, floor, even the ceiling if you are feeling wild. It creates this monolithic, carved-out-of-stone look. If water management is still a worry in a tight space, get a glass screen that folds flat against the wall. You use it when you shower, then tuck it away so you can actually walk to the sink without shimmying. It is smart. It is efficient.
Spa-Like Wet Room Bathroom Design: Tiles and Luxury Fixtures
If you want it to feel like a spa, you cannot use basic ceramic. You just cannot. Natural stone—travertine, marble, that kind of thing—is stunning, but it is high maintenance. Actually, marble is a massive pain because it is porous. You will be sealing it every year. I usually point people toward high-end porcelain. It looks exactly like slate or limestone but you can hit it with actual cleaners without ruining it. Just check the slip rating. You want something with tooth.
I see people get blinded by pretty marble samples, so let us look at the actual performance of these materials in a wet environment.
| Material | Slip Resistance | Maintenance | Best Use Case |
|---|---|---|---|
| Polished Marble | Low | High | Accent walls only |
| Textured Porcelain | High | Low | Floors and heavy use areas |
| Natural Slate | Very High | Medium | Rustic spa environments |
| Tumbled Travertine | Medium | High | Warm, organic aesthetics |
My Take
Porcelain is the king of the wet room. You get the look of stone with zero of the headache, and your cleaning lady will actually thank you.
The texture matters. You want it to feel organic. Tactile. (Think: rainy day in the mountains, not slippery hospital floor.) Large tiles are great for that seamless look, but I actually like using smaller mosaics on the shower floor itself. The extra grout lines give your feet more grip. It is safer. Most of the good brands now make matching sets, so your big wall tiles and tiny floor mosaics are the exact same shade.
The fixtures are where the money goes. Concealed valves are the way to go. You hide all the ugly pipework behind the wall, and all you see are the handles and a huge rain-shower head coming out of the ceiling. It is minimalist. It is clean. And the lighting—get some recessed LEDs in a wall niche. It makes the water look like it is glowing. It is a vibe.
Grout Selection
Avoid light-colored grouts in a wet room as they will eventually discolor from mineral deposits and soap scum. Use ‘epoxy grout’ for superior water resistance and color longevity in high-moisture environments.
Wet Room Bathroom Design Pros and Cons: Practicality and Costs
Look, I will be straight with you. These things are not cheap. You are looking at a 30% to 50% jump in price over a standard tray and door reno. Most of that is the invisible stuff—the tanking, the specialized drainage, the extra floor prep. But the payoff is there. They are ridiculously easy to clean. No tracks for mold to grow in. No weird corners.
Let us talk numbers because the hidden costs of a wet room usually surprise people during the first quote.

My Take
Do not try to save money on the tanking. If you cut corners on the membrane, you are just paying for a future demolition.
They also future-proof the house. If you are planning on staying in your home as you get older, or if you have someone with mobility issues visiting, that level-access floor is gold. No stepping over a ledge. It adds real value to the property because it looks expensive and technically impressive.
The downside? Damp towels. If your ventilation sucks, everything in the room stays humid. You need a fan that actually moves air—something high-extraction. If you do not, you will get mildew on the ceiling, and your mirrors will be foggy for an hour after every shower. It is a trade-off.
Wet Room Bathroom Design Trends 2026: The Future of the Space
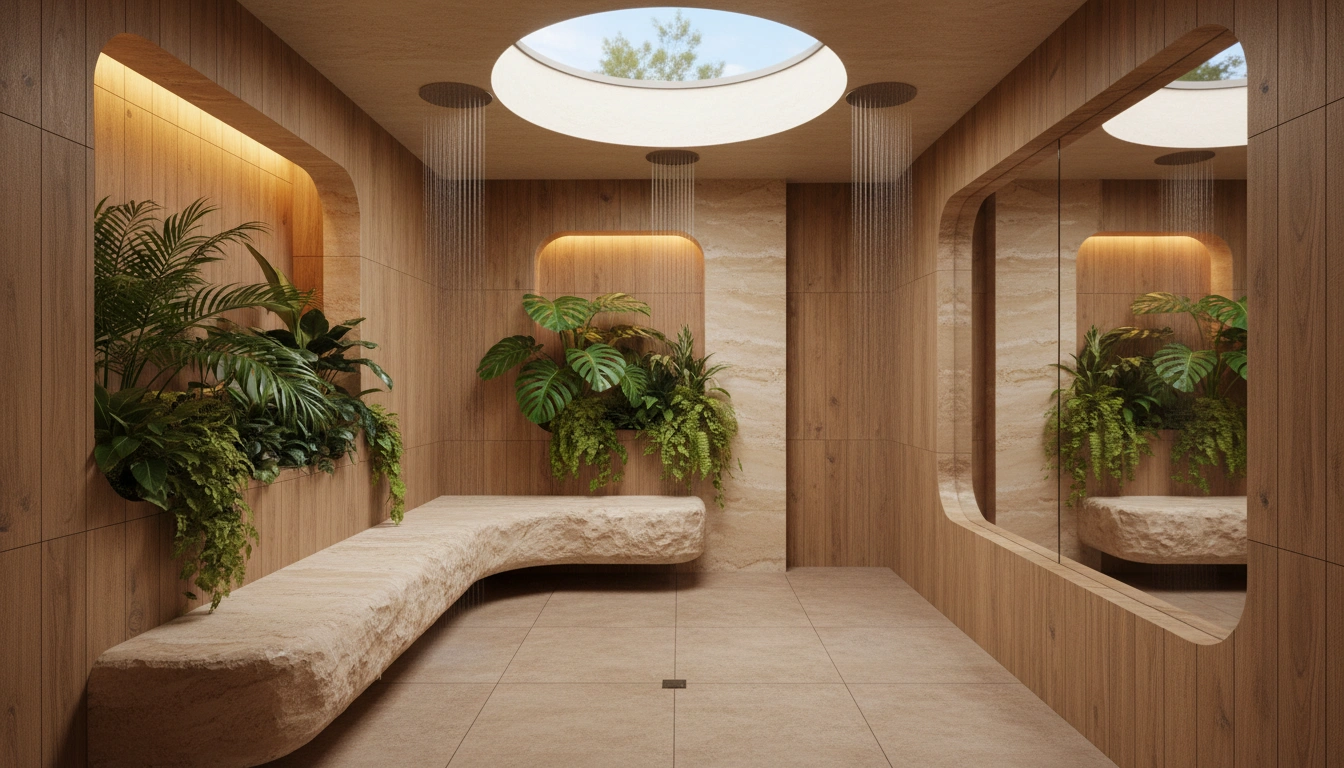
Looking toward 2026, we are seeing a lot of biophilic stuff. Basically, bringing the outside in. Wood-look porcelain (that actually feels like grain) and maybe some built-in niches for plants that love steam. We are also seeing invisible drains. It is just a tiny slit in the tile work where the water vanishes. You can barely see it.
Accessibility is getting a makeover, too. It does