


So, you want a rustic bathroom. I get it. There’s a warmth there you don’t get from staring at a bunch of shiny chrome and tile that looks like a hospital. It feels like a real place. Been doing this since ’98, and the homes people love the most, the ones that feel lived in, they usually have some of this style going on.
But here’s the thing.
Putting together a bathroom with rustic bathroom accessories isn’t just about buying stuff that looks old. A bathroom is a battlefield. It’s water, steam, and humidity, all day, every day.
The biggest mistake I see, over and over, is people falling for a look and not thinking for one second about what six months of steam from a hot shower is going to do to that beautiful, raw-wood thing they just bought.
So I’m going to give you the rundown. The real stuff, from a guy who has to come in and fix it when it goes wrong. So your little retreat looks good for more than just a picture.
Choosing Wooden Rustic Bathroom Accessories That Last

Wood. It’s the heart of the whole rustic look. In a bathroom, it can also be a total nightmare. It’s all about the type of wood and how it’s sealed. Or if it’s sealed at all.
When you’re looking at rustic bathroom accessories made of wood, you can’t just throw a piece of untreated pine in there and hope for the best. The humidity will get into it, and it’ll swell up, warp, and start growing stuff you don’t want. I had to rip out a vanity top over on Preston Drive last year. Six months. Looked like a wavy potato chip because the guy who installed it didn’t seal the underside.
If you’re putting wood near a sink or tub, you want something with natural oils, like teak or cedar. They can handle themselves a little better. But even then, I’d still put a finish on it.
For everything else—pine, oak, whatever—a good sealant is not optional. You need a marine-grade varnish or a few coats of oil-based polyurethane. And you have to seal every single surface. The top, the bottom, the sides, any holes you drill for plumbing. All of it. You’re making a barrier.
To make this a bit clearer, here’s a quick cheat sheet on the wood you’ll run into:
| Wood Type | Good for Bathrooms? | What You Gotta Do |
|---|---|---|
| Teak or Cedar | Yes, naturally better with water | Still needs a light seal to be safe |
| Pine | On its own? No way. | Must be sealed on all sides with polyurethane |
| Oak | It’s tough, but not waterproof | Must be sealed on all sides, no exceptions |
| Reclaimed Wood | Yes, for the look | Seal it with a matte or satin finish to keep the old look |
My Take: Don’t cheap out on the sealant. A five-dollar can of spray paint isn’t a sealant. Get the real marine-grade stuff if the wood is anywhere near the splash zone. It’s the difference between it lasting for years or for months.
Think about the small stuff. A wooden soap dish or a bath caddy. They look great, but they’re sitting in the splash zone. They need that protective coat or they’re just future garbage.
Using Woven Baskets for Smart Rustic Storage
Every bathroom needs storage, and those woven baskets are pretty popular. They do a good job of softening up a room that’s all hard surfaces. Tile, porcelain, metal… then bam, a soft basket. It works.
You see them made of seagrass, wicker, rattan, all that. They all give you that same kind of cozy, natural look. I recommend them to people all the time if they want to add something without calling me to install it.
But they’re made of dried grass. Think about that.
They can’t get soaked. So you have to be smart about where you put them. They’re perfect for holding towels on a shelf, way across the room from the shower. Or for stashing extra toilet paper. Or, even better, put them inside a closet or a vanity cabinet, where they’re protected. If you really want one on the counter, get one with a cloth liner you can pull out and wash.
On a job last fall, we put a couple of big wicker ones on the open shelf of a vanity. The wife, Jenny I think, used them for the kids’ bath toys. Hides the clutter, looks good. That’s the right way to do it.
Farmhouse vs. Rustic Bathroom Decor: What’s the Difference?
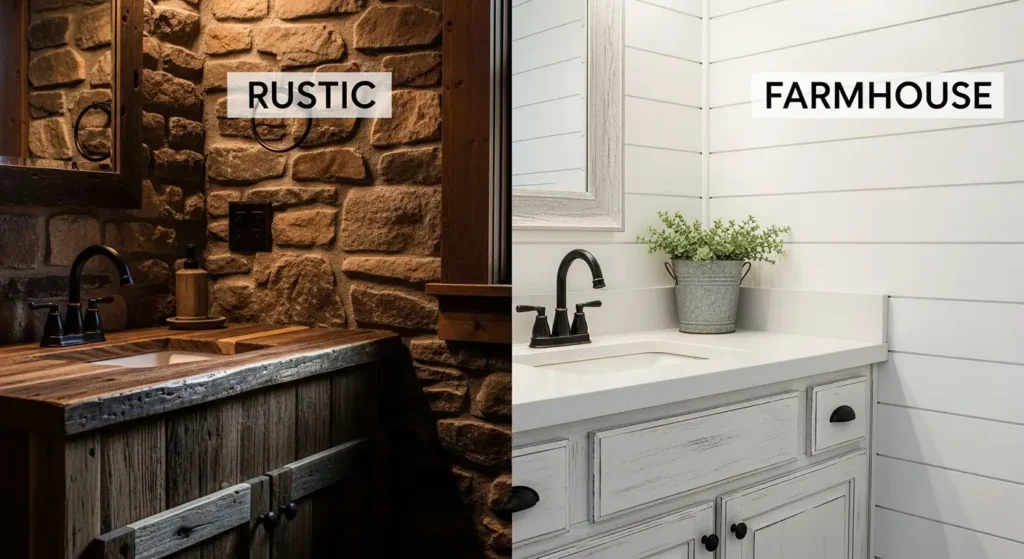
People mix these two up all the time. Farmhouse and rustic. They’re not really the same thing. Farmhouse is like rustic’s cleaner cousin who lives in the suburbs.
True rustic is heavy. Dark woods, rough stone, feels like a cabin in the woods. Farmhouse takes that idea and just… cleans it up. It’s brighter. You see a lot of white, a lot of shiplap on the walls. The stuff feels less like you found it in a barn and more like you bought it from a store that designed it to look like you found it in a barn. You know?
Look, the words get thrown around a lot. Let’s put them side-by-side so you can see what I mean.
| The Vibe | Rustic (The Original) | Farmhouse (The Cousin) |
|---|---|---|
| Color Palette | Dark, earthy, natural wood tones | Bright, lots of white and gray, light wood |
| Key Materials | Rough-cut wood, stone, aged metal | Shiplap, galvanized tin, matte black fixtures |
| Overall Feel | Like a mountain cabin | Like a clean, modern country home |
Pro-Tip: You don’t have to pick one. Most of the best-looking jobs I’ve done mix elements from both. Just know which direction you’re leaning so the room feels intentional, not just cluttered.
When you’re looking for farmhouse rustic bathroom decor, you’re gonna see galvanized tin, wire baskets, and signs with words on them.
A good way to get that farmhouse thing is to mix materials. Like a modern-looking matte black faucet on a sink that sits on an old wooden vanity. Or using a little metal bucket as a trash can. It works.
Those wire baskets are everywhere. They’re fine for holding some hand towels. But a word of advice, it’s really easy to make it look… tacky. One sign with a folksy saying might be fine. A whole wall of them just looks like a gift shop exploded. The the whole point is to find a balance.
How to Safely Install Reclaimed Wood Shelves
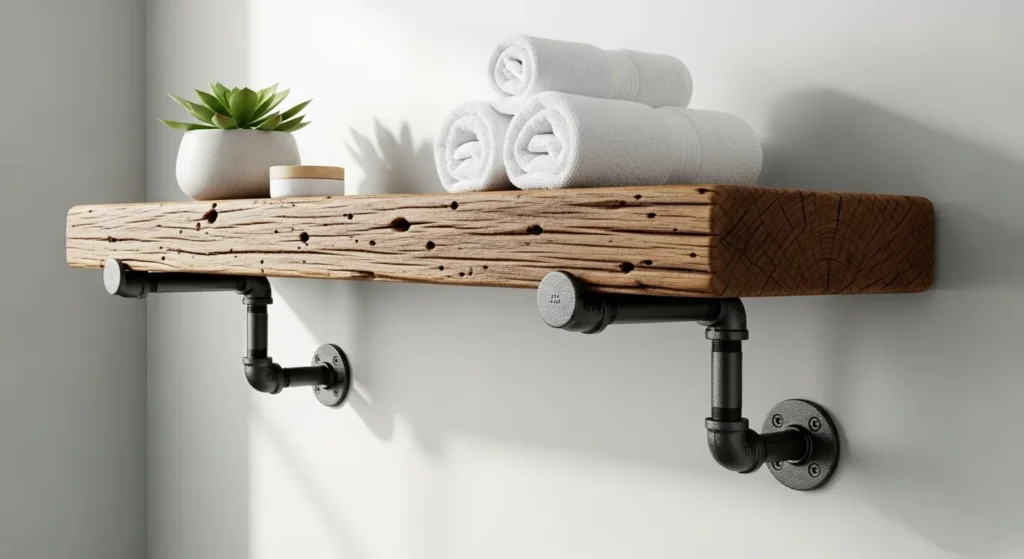
Nothing screams rustic louder than a big, thick slab of reclaimed wood on the wall. It’s got history. Nail holes, saw marks, all of it. It’s one of my favorite rustic bathroom accessories to put in because the change is instant. But you absolutely cannot mess up the installation.
This wood is heavy. Seriously heavy. You have to, have to, anchor the brackets into the studs in the wall. Not the drywall. I don’t care what the package on the drywall anchor says it can hold. It will fail. I promise you it will fail, and you’ll have a giant hole in your wall and a broken toilet. Get a stud finder. Find the studs. Use big lag bolts to sink those brackets in.
The industrial pipe bracket thing is a popular look. It fits the style.
Once it’s up, you still have to seal it. You want to protect it from the moisture, but you don’t want to make it look like a piece of plastic. I usually give it a light sanding, just to knock the splinters off, and then hit it with two or three coats of a clear polyurethane with a matte or satin finish. No gloss. The gloss kills the whole look.
Easy DIY: Mason Jar Bathroom Accessories
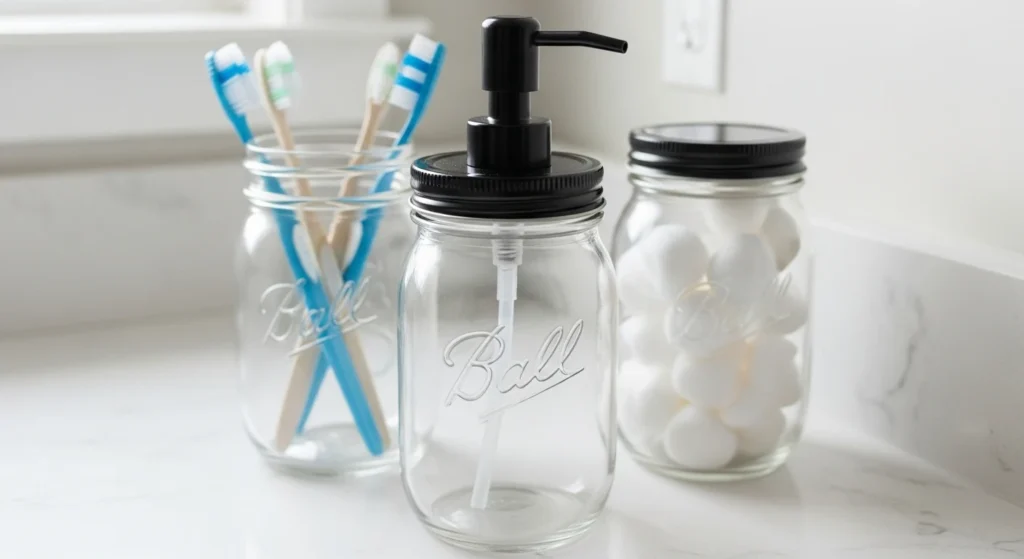
And then there’s the mason jar. Of course.
If you want cheap and easy, here you go. They work, I’ll admit it. They fit the whole rustic and farmhouse thing perfectly. Good for holding cotton balls, Q-tips, toothbrushes. You can see what’s in there. It’s fine.
You can do a lot with them. They sell kits now with the soap pump lids already on them, but you can make your own easy enough. Just buy the pumps online.
Here’s a tip, though. Those metal lids and pumps? They rust. Especially the cheap ones. They’ll leave a nasty orange ring on your countertop. Before you even use it, take it outside and give the whole lid, inside and out, a quick spray with some clear coat. Let it dry. It’ll save you a headache. People also paint them with chalk paint or whatever. It’s a simple little project.
It’s a simple project, but here’s the quick and dirty on what to watch out for:
| The Good Part | The Catch |
|---|---|
| Looks great and fits the style | Cheap metal lids and pumps will rust |
| Super cheap and easy to find | Rust stains your counter with orange rings |
| Versatile for holding lots of things | Requires a little prep work to prevent rust |
My Take: For a couple of bucks and five minutes with a can of clear coat, they’re a solid choice. Just do that prep work on the lid and you’ll be fine. It’s a tiny bit of effort that saves you from a permanent stain later.