


As a contractor who’s seen countless bathroom transformations, I can tell you that a wet room bathroom design is more than just a trend; it’s a smart, sophisticated choice that homeowners are increasingly gravitating towards. When done right, a wet room can offer an unparalleled sense of space and luxury, making your daily routine feel a little more like a spa experience.
But I’ll be honest with you – it’s not just about knocking down a shower screen. It requires meticulous planning and a deep understanding of waterproofing to get it right. From my years on the tools, I’ve learned that cutting corners here will always lead to costly headaches down the line. Let’s talk about what really makes a wet room shine and how to avoid the common pitfalls.
Understanding the Core Features of a Functional Wet Room
When I talk about a wet room, I’m describing a bathroom where the shower area is completely open and level with the rest of the floor, creating a seamless, barrier-free space. This isn’t just about aesthetics; it’s about functionality and accessibility. The entire room, or at least the showering zone, needs to be fully waterproofed, effectively becoming a giant shower tray.
The Seamless Floor and Gradient
The defining characteristic of a wet room is its floor. There’s no step-up into a shower tray; the floor flows continuously. To achieve this, we create a subtle gradient, often a 1-2% slope, towards the drain.
This isn’t just a simple tilt; it has to be carefully calculated to ensure all water drains efficiently without pooling. I’ve seen projects where the gradient wasn’t properly established, leading to stagnant water and endless calls from unhappy clients. Getting this base right from the start, whether it’s through a pre-formed tray former or a built-up screed, is absolutely critical.
Integrated Shower Area
Because there are no physical barriers like shower trays or curbs, the shower area feels integrated with the rest of the room. Sometimes we’ll use a single glass screen to contain splashes, but even this is often minimal or entirely absent in true open-plan designs.
This integrated approach really opens up a smaller bathroom, making it feel much larger and more airy. It also simplifies cleaning, as there are fewer nooks and crannies for grime to accumulate. It’s about creating a harmonious space where water is expected to be part of the floor, not confined by it.
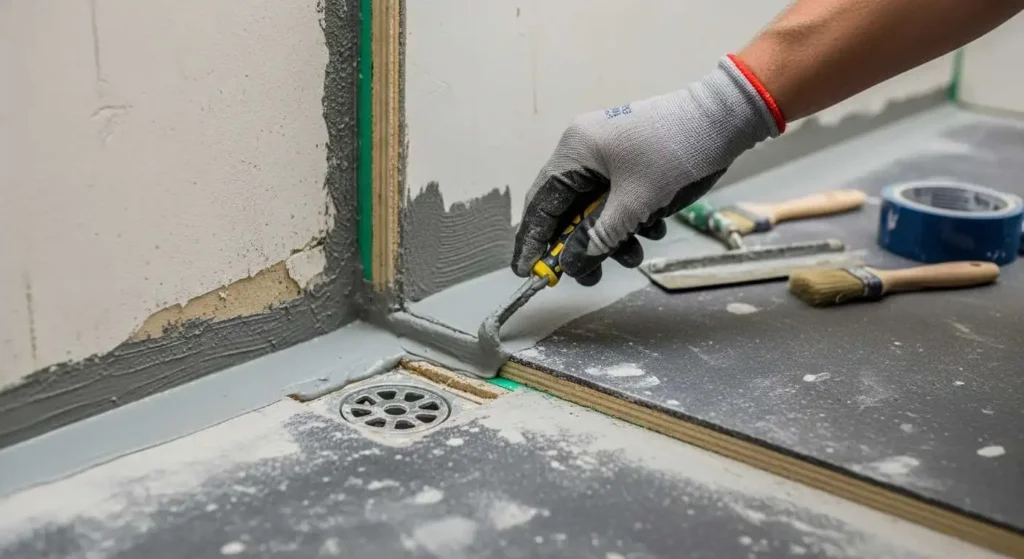
The Importance of Tanking
This is where the rubber meets the road. “Tanking” refers to the comprehensive waterproofing system applied to the floor and walls of the wet room. It’s a multi-layered approach, typically involving waterproof membranes, sealants, and often a cement-based tanking slurry.
I can’t stress this enough: proper tanking is the foundation of any successful wet room. Without it, you’re looking at potential water damage to your subfloor, joists, and even adjoining rooms. We treat the entire area like a swimming pool, ensuring every joint, corner, and penetration is sealed to perfection. This isn’t a DIY job for the faint of heart; it requires specialized knowledge and attention to detail that comes with experience.
Below are the key components typically involved in a robust wet room tanking system:
| Component | Purpose | Examples/Notes |
|---|---|---|
| Waterproof Membranes | Primary barrier against water ingress, covering large surfaces. | Sheet membranes (e.g., Schluter-Kerdi), liquid applied membranes. |
| Sealants | Ensure watertight integrity at junctions, penetrations, and edges. | Flexible adhesives, silicone sealants specifically for wet areas. |
| Tanking Slurry | Cement-based coating applied to floors and walls for comprehensive waterproofing. | Applied in multiple coats, often a polymer-modified cement. |
| Sealing Tapes/Bands | Reinforce and seal joints, corners, and wall-to-floor transitions. | Fabric-reinforced, elastomeric tapes. |
| Pre-formed Trays | Create the precise gradient to the drain in the shower area. | Sloping shower formers, often made of foam board or screed. |
Choosing the Right Waterproofing System and Materials for Your Wet Room
Picking the right materials for your wet room isn’t just about what looks good; it’s about durability, longevity, and above all, effective waterproofing. This is an area where investing in quality truly pays off.
Substrate Preparation is Key
Before any waterproofing membrane even touches the surface, the substrate—the base layers of your floor and walls—must be perfectly prepared. This means ensuring it’s stable, clean, dry, and free from any loose debris. For floors, we’re often dealing with timber joists requiring stable marine plywood or cement board overlays, or a concrete slab. On walls, it’s usually plasterboard or cement board.
Any movement in the substrate can compromise the waterproofing system down the line. I’ve walked onto jobs where inadequate substrate prep meant tearing out brand new tiles just a few months later. It’s painstaking work, but it’s non-negotiable for a lasting finish.
Membranes and Tanking Kits
When it comes to the actual waterproofing layer, there are several excellent systems available. Brands like Schluter-Kerdi and Wedi are industry standards for good reason. They offer comprehensive kits that include waterproof boards, membranes, sealing bands, and adhesives, all designed to work together seamlessly.
A liquid applied membrane, often a cementitious or acrylic-based product, is another common choice, applied in multiple coats. The key is to ensure complete coverage, especially at wall-to-floor junctions and around the drain, using appropriate sealing tapes and corners. On a recent project, we used the Schluter-Kerdi system, and the peace of mind knowing it’s a fully integrated, proven solution is immense.
Here’s a comparison of common wet room waterproofing systems:
| System Type | Description | Key Components | Advantages | Disadvantages |
|---|---|---|---|---|
| Sheet Membrane Kits | Pre-formed boards/sheets and accessories that create a complete, integrated system. | Waterproof boards (e.g., Wedi, Schluter-Kerdi), sealing bands, pre-formed corners, adhesives. | Proven reliability, consistent thickness, faster installation in some cases. | Can be higher initial material cost, requires precise measurement and cuts. |
| Liquid Applied Membranes | Cementitious or acrylic-based liquid applied in multiple coats to form a seamless barrier. | Primer, liquid membrane (cement-based or acrylic), sealing tapes for joints. | Conforms to irregular shapes, cost-effective for larger areas, flexible once cured. | Requires multiple coats with curing time between, thickness can vary with application. |
Floor and Wall Finishes
Once the waterproofing is complete and cured, you can move to the fun part: choosing your finishes. For wet rooms, porcelain tiles are a popular choice due to their low porosity, durability, and vast aesthetic options. Natural stone can also be stunning, but it requires more maintenance and sealing.
Large format tiles can minimize grout lines, which means less cleaning and fewer places for mold to grow. Whatever you choose, ensure the tiles are slip-resistant, particularly on the floor. For grout, I always recommend an epoxy-based product; it’s far more resistant to water and staining than standard cementitious grout, providing an extra layer of protection and significantly reducing maintenance for the homeowner.
Consider the characteristics of different finish materials for your wet room:
| Feature | Porcelain Tiles | Natural Stone | Epoxy Grout | Standard Cementitious Grout |
|---|---|---|---|---|
| Porosity | Very Low | Moderate to High (requires sealing) | Very Low | Moderate to High |
| Durability | High (resistant to wear, scratches) | Variable (depends on stone type) | High (chemical and stain resistant) | Moderate (can degrade over time) |
| Maintenance | Low (easy to clean, minimal sealing) | High (regular sealing, specific cleaners) | Very Low (resistant to staining, mold, mildew) | Moderate (prone to staining, mold, mildew) |
| Slip Resistance | Excellent options available (textured) | Variable (can be slippery when wet) | Not a primary factor for floor slip resistance | Not a primary factor for floor slip resistance |
| Aesthetic Versatility | Vast range of colors, patterns, sizes | Unique, organic, luxurious feel | Uniform, clean lines, color stability | Traditional, standard appearance |
Expert Space Planning and Critical Drainage Solutions for Wet Room Success
Designing a wet room involves more than just selecting pretty tiles. It demands careful consideration of layout and, critically, a robust drainage system. It’s about making sure the space works as efficiently as it looks.
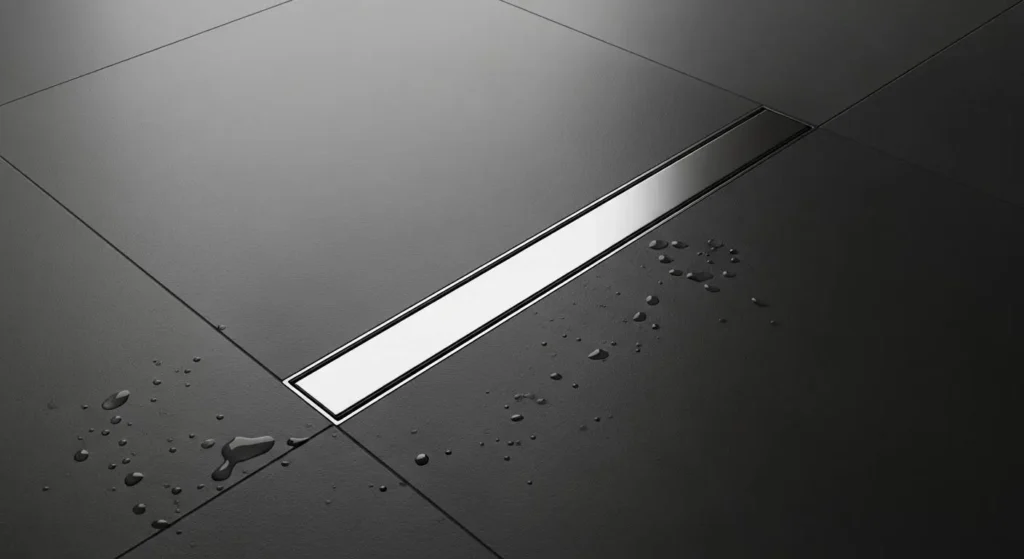
Shower Tray or Linear Drain?
While wet rooms are characterized by their seamless floors, the actual drain is central to the design. You essentially have two main options: a traditional point drain, usually square, or a linear drain (also known as a channel drain). Point drains require the floor to slope in four directions towards the central point, which can be more complex to tile.
Linear drains, which are longer and often sit along one wall or at the entrance to the shower area, only require a single-direction slope, making tiling simpler and often providing a more minimalist look. I often lean towards linear drains for their aesthetic appeal and ease of installation, especially with larger format tiles. They also tend to handle higher flow rates more effectively.
Here’s a comparison of common shower drain types for wet rooms:
| Drain Type | Description | Floor Slope Required | Tiling Complexity | Aesthetic | Flow Rate Handling |
|---|---|---|---|---|---|
| Point Drain | Typically a square or circular drain located centrally in the shower area. | Four-directional slope towards the drain from all sides. | More complex, requires precise cuts for a 4-way fall. | Traditional, utilitarian. | Good (ensure adequate sizing for shower flow). |
| Linear Drain | A long, narrow channel drain, often placed along a wall or at the entrance to the shower zone. | Single-directional slope towards the drain. | Simpler, easier to use with large format tiles. | Modern, minimalist, seamless. | Excellent (often handles higher volumes efficiently). |
Gradient and Flow Rate Calculations
This is where the science comes in. The floor gradient isn’t just guesswork; it needs to be sufficient to direct all shower water towards the drain without creating puddles, but not so steep that it becomes uncomfortable or unsafe to walk on. We typically aim for a fall of 1:80 to 1:100.
Simultaneously, the drain itself must be capable of handling the flow rate of your chosen showerhead. A high-pressure, multi-jet shower system will require a higher capacity drain than a standard shower. Failing to match these can lead to water backing up, which is a major design flaw. Always calculate your shower’s flow rate and specify a drain that can comfortably exceed it.
Ventilation and Humidity Control
One often overlooked aspect of wet room design is ventilation. With more open water exposure, humidity levels can skyrocket. Without adequate ventilation, you’re setting yourself up for mold, mildew, and potential damage to non-waterproofed elements in the room or even adjacent areas. An extractor fan isn’t just a suggestion; it’s a necessity.
I always recommend an oversized fan for a wet room, often one rated at a higher cubic feet per minute (CFM) than you’d use in a traditional bathroom, ideally tied into the lighting circuit and with a timer overrun. You might also consider underfloor heating, which helps dry out the floor quickly after use, reducing humidity and improving comfort.
Effective ventilation and drying are critical for wet room longevity and comfort:
| Strategy | Benefit | Recommendation |
|---|---|---|
| Extractor Fan | Actively removes humid air, preventing condensation, mold, and mildew. | Install an oversized fan with higher CFM; ideally tied into lighting circuit with a timer overrun. |
| Underfloor Heating | Helps to dry the floor quickly after use, reducing ambient humidity and improving comfort. | Consider electric or water-based systems beneath the floor finish. |
| Natural Ventilation | Supplements mechanical ventilation by allowing fresh air exchange. | Ensure a window is available for passive airflow, though not sufficient as a primary solution. |
Inspiring Modern Wet Room Shower Concepts

Once the technical details are sorted, we can really start thinking about the design. Modern wet rooms offer incredible flexibility, allowing for some truly stunning and practical shower concepts.
Minimalist Glass Panels
While the essence of a wet room is openness, strategically placed glass panels can define the shower zone without sacrificing the spacious feel. Frameless glass panels are my go-to. They maintain visual continuity, are easy to clean, and virtually disappear into the design, letting the tiling and fixtures take center stage.
They prevent excessive splashing onto other bathroom elements like the vanity or toilet, without creating a closed-off cubicle feel. Sometimes, we’ll opt for a full-height, single panel of obscure or etched glass for privacy, adding a touch of elegance.
Recessed Niches and Bench Seating
These are the details that elevate a wet room from functional to luxurious. Recessed shower niches, built directly into the wall during construction, provide convenient storage for shampoos and soaps without protruding into the shower space. This keeps the lines clean and clutter-free.
Similarly, a built-in bench seat, tiled to match the rest of the room, offers comfort and accessibility. It’s perfect for those who want a place to relax, shave their legs, or for homeowners planning for future accessibility needs. These elements require careful planning during the framing and waterproofing stages, as they need to be fully integrated and sealed.
Lighting Design in Wet Zones
Good lighting is paramount in any bathroom, but especially in a wet room where reflections and wet surfaces can play tricks. Recessed LED spotlights, rated for wet zones (IP65 or higher), are an excellent choice for general illumination and highlighting specific areas.
Consider adding mood lighting, perhaps a strip of LED lighting within a recessed niche or along the base of a wall. The right lighting can transform the ambiance, making the space feel warmer and more inviting. Always remember that any electrical work in a wet room must be carried out by a qualified electrician and adhere to strict safety regulations.
Understanding the Ingress Protection (IP) ratings for electrical fixtures is crucial in wet rooms:
| Application | Minimum IP Rating | Description |
|---|---|---|
| General Lighting (Direct Wet Zones) | IP65 | Protected against dust ingress and low-pressure water jets from any direction. Suitable for areas directly exposed to shower spray. |
| Zone 1 (Directly above shower/bath to 2.25m) | IPX4 | Protected against splashing water from any direction. |
| Zone 2 (60cm around shower/bath, up to 2.25m) | IPX4 | Protected against splashing water from any direction. |
| Outside Zones (Beyond Zone 2) | No specific IP req. | Standard bathroom fittings are acceptable. |
Wet Room vs. Traditional Bathroom: Weighing Your Options
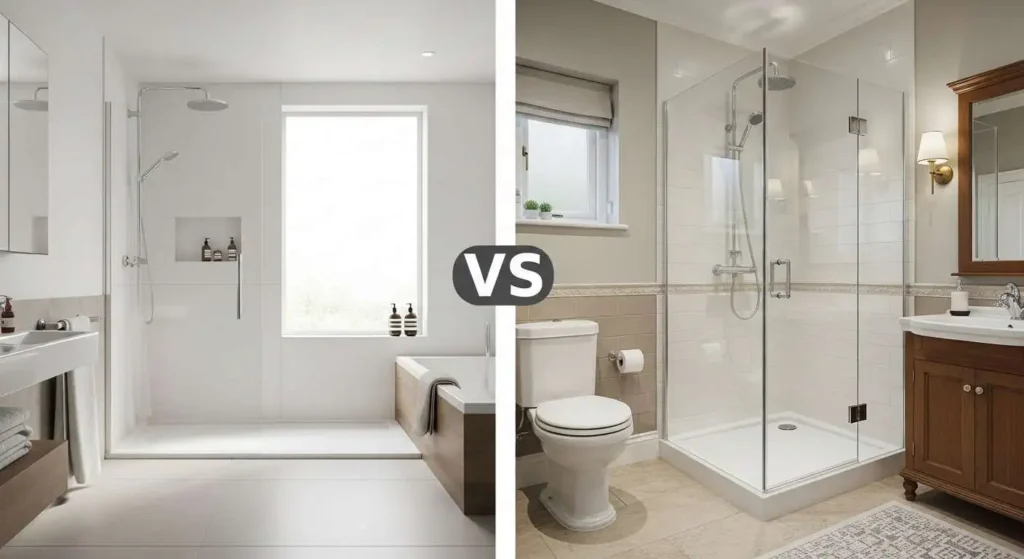
Deciding between a wet room and a traditional bathroom involves balancing aesthetics, functionality, and practical considerations. Both have their merits, but they cater to different needs and expectations.
Advantages: Accessibility, Aesthetics, Space Perception
The primary appeal of a wet room is its unmatched accessibility. With no steps or barriers, it’s ideal for people with mobility challenges, children, or simply for future-proofing your home. Aesthetically, wet rooms offer a clean, minimalist look that’s incredibly appealing.
The continuous floor and wall surfaces create a sense of expansive space, making even a small bathroom feel larger and more open. This seamless design also makes cleaning considerably easier, as there are fewer obstacles and crevices where dirt and grime can accumulate. From an investment perspective, the modern, high-end appeal can certainly enhance your home’s value.
Disadvantages: Cost, Installation Complexity, Maintenance
On the flip side, wet rooms typically come with a higher initial installation cost compared to a standard bathroom. This is primarily due to the extensive waterproofing required, specialized drainage systems, and the labor involved in precise gradient creation. The installation process itself is more complex and time-consuming, requiring skilled professionals who understand the intricacies of wet room construction.
A common concern I hear is about potential water splashing onto other areas of the bathroom, which can be mitigated with proper design, ventilation, and sometimes a subtle glass screen. Additionally, while overall cleaning can be easier, some homeowners find the constant need to dry the entire floor after each shower to be a minor inconvenience.
Here’s a comparative overview of wet rooms versus traditional bathrooms:
| Feature | Wet Room | Traditional Bathroom |
|---|---|---|
| Accessibility | Excellent: Barrier-free, ideal for mobility challenges, children, and future-proofing. | Variable: Often involves steps into a shower tray or bath, limiting accessibility. |
| Aesthetics | Modern, minimalist, spacious, seamless design; creates a sense of luxury. | Classic, defined shower/bath area; can feel more compartmentalized. |
| Space Perception | Makes the room feel significantly larger and more open due to continuous surfaces. | Can feel more confined, especially in smaller bathrooms, with distinct shower/bath enclosures. |
| Initial Installation Cost | Higher: Due to extensive waterproofing, specialized drainage, and precise gradient creation. | Generally lower: Standard plumbing and less extensive waterproofing requirements. |
| Installation Complexity | High: Requires meticulous waterproofing, exact gradient installation, and skilled labor. | Moderate: Standard construction methods, fewer specialized waterproofing demands. |
| Maintenance & Cleaning | Easier overall cleaning due to fewer obstacles and crevices, but entire floor often needs drying after each use. | Specific cleaning for shower/bath area, rest of the floor typically stays dry. |
| Home Value & Appeal | Can add significant value as a luxury, contemporary, and accessible feature, appealing to a wide range of buyers. | Standard value, considered an expected amenity, but typically doesn’t add premium value unless uniquely renovated. |
Building a wet room is a commitment, requiring attention to detail, quality materials, and skilled craftsmanship. But for those who value modern aesthetics, accessibility, and a truly unique showering experience, it’s an investment that pays dividends every single day. The feeling of stepping into a spacious, seamless shower zone is unmatched, transforming a simple necessity into a moment of pure relaxation.
How much does a wet room typically cost?
From my experience, a full wet room installation is generally more expensive than a traditional bathroom of the same size. You’re looking at anywhere from £8,000 to £20,000+ (or $10,000 to $25,000+) for a complete project, depending on the size, quality of materials, and complexity of the waterproofing system.
This includes everything from the subfloor modifications and tanking to the tiling, fixtures, and labor. The waterproofing system itself can add a significant amount to the overall cost, but it’s an investment you absolutely cannot skimp on.
Do wet rooms add value to a home?
Absolutely, a well-designed and properly installed wet room can certainly add value to your home. They are seen as a luxury feature, offering enhanced accessibility and a contemporary aesthetic that appeals to a wide range of buyers. In competitive housing markets, unique and functional features like a high-quality wet room can make your property stand out. It’s an investment that not only improves your daily living but also boosts your home’s market appeal.
Can you install a wet room on an upstairs floor?
Yes, you can definitely install a wet room on an upstairs floor! This is a common question, and the answer lies entirely in the quality of the waterproofing and the structural integrity of your floor. When built correctly, with proper tanking membranes and robust floor construction (often requiring structural reinforcement with additional joists or specific wet room floor formers), an upstairs wet room is completely safe and leak-proof. It just requires even more meticulous attention to detail and a highly skilled installer to ensure every layer of protection is perfectly applied.